Risk Identification In Project Management: Guide + Tools

Risk identification in project management is how you find and document possible issues before they impact delivery.
This guide walks you through proven methods for recognizing possible threats and advantages, building a usable risk log, and applying practical strategies for mitigation.
Key Takeaways
- Risk identification means spotting, describing, and documenting potential threats or advantages that could affect your project’s deliverables, schedule, or quality.
- Early detection enables targeted preventive measures and better allocation of resources.
- Common techniques include SWOT analysis, brainstorming, the Delphi method, documentation reviews, and predictive analytics.
- A well-maintained register of risks helps track issues, root causes, and planned responses over the entire project lifecycle.
What Is Risk Identification in Project Management?
Risk identification in project management is the structured process of spotting possible hazards in the project (from technical issues and resource shortages to regulatory changes or market shifts) and documenting them.
The goal is to identify both challenges and advantages that may impact deliverables, schedule, budget, or performance.
This work feeds directly into your project risk assessment and mitigation planning, so that you have a clearer picture of where to focus attention.
Definition
According to the Project Management Institute’s PMBOK® Guide:
Risk identification is the process of determining which risks may affect the project and documenting their characteristics. It’s the first step in the broader project risk management process.
In practice, this means systematically examining your project environment, stakeholder perspectives, and technical details to find potential challenges.
Each identified item is then recorded in a risk log with its cause, potential impact, and timeframe. This early groundwork gives you a concrete, actionable list to address before moving to the evaluation of risks.
Why Is Tracking Risks So Important?
Projects rarely fail because of a single, dramatic issue. More often, they stumble over unaddressed hazards that snowball.
When you recognize concerns early, you make smarter trade-offs, keep project teams aligned, and avoid last-minute firefighting.
Involving stakeholders in this stage also builds a shared awareness of risks during the project lifecycle, which increases buy-in and improves decision-making when problems arise.
What Is the Risk Management Lifecycle?
The risk management lifecycle is the ongoing process of identifying, evaluating, and responding to uncertainty so a project stays aligned with its objectives.
It’s not just a checklist; it’s a continuous cycle that helps project teams control challenges and capitalize on uncovered opportunities (also known as positive risks) throughout the project delivery process.
In essence, it connects uncertainty planning to every phase of the project lifecycle.
Core Concepts
Effective risk management treats uncertainty as measurable and manageable. It requires spotting both issues that could slow progress and benefits that could accelerate it.
Once found, these factors are logged in a risk tracker and monitored over time. This proactive approach replaces reactive firefighting with planned, fact-based actions.
Risk Lifecycle Stages
Managing project risks is not a “set it and forget it” task. The lifecycle generally moves through the stages of Planning → Identification → Analysis → Response Planning → Monitoring and Control.
Here’s what the process looks like:
1. Planning: Build a risk management plan that defines how you’ll approach identification, analysis, and monitoring.
2. Identification: Spot and log risks through methods like project hazard analysis, interviews, or historical data reviews.
3. Analysis: Evaluate risks using qualitative evaluation of risks (descriptive) or quantitative evaluation of risks (numerical).
4. Response Planning: Develop strategies for avoidance, mitigation, transfer, or acceptance.
5. Monitoring and Control: Track issues, update the risk log, and adjust plans as the project evolves.
What Are The Best Techniques for Identifying Project Risks?
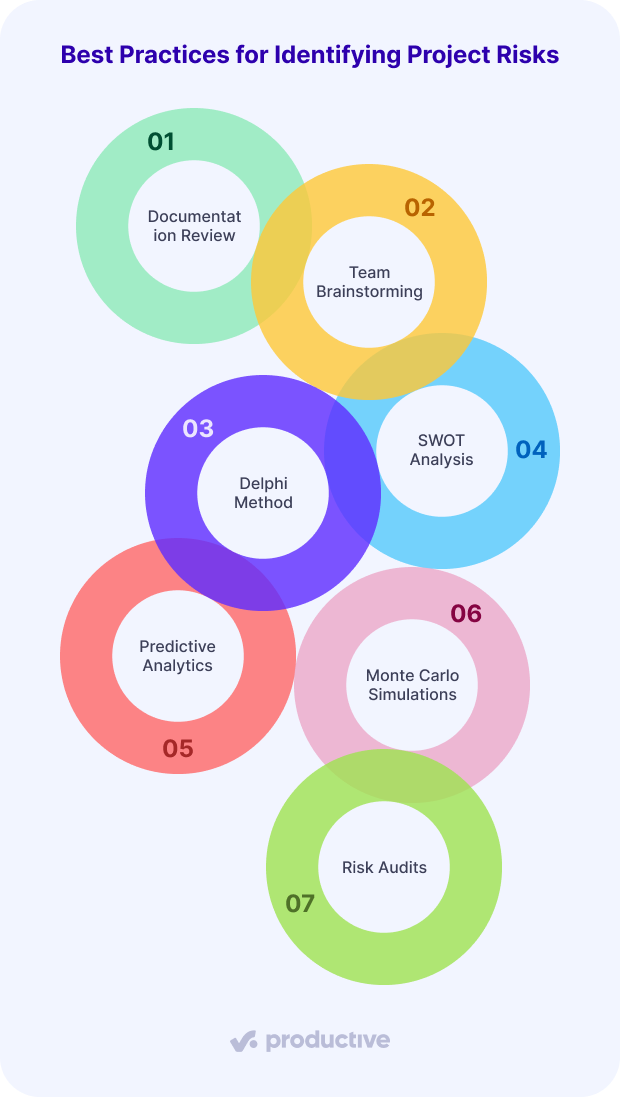
The best techniques for identifying project risks are documentation review, team brainstorming, the Delphi method, SWOT analysis, predictive analytics, Monte Carlo simulations, and risk audits.
Keep in mind that there’s no one-size-fits-all method, and the most effective approach blends multiple techniques to uncover both the obvious hazards and the subtler issues that could otherwise be missed.
Documentation Review
Sometimes the quickest way to spot risks is to start with the paperwork.
Reviewing your project management plan, scope statements, technical specs, and contracts can reveal early warning signs such as unrealistic timelines, unclear requirements, or vendor dependencies that may later cause issues.
Focus on:
- Scope documents: Look for ambiguous deliverables that could cause scope creep.
- Historical project data: Past projects often flag recurring issues.
- Contract terms: Identify clauses that could create project uncertainties if not met.
- Technical requirements: Spot feasibility concerns early.

Centralize all project documentation, so that your team members can edit, share and collaborate in a shared workplace.
Team Brainstorming
Gather your team in a workshop setting and encourage everyone to share possible hazards without immediate judgment.
Classic approaches like the Nominal Group Technique, where ideas are submitted anonymously, can help quieter voices contribute and prevent groupthink.
You can also hold an identification workshop to formalize the process and ensure every team member has input. The goal here is quantity first. Later, you’ll narrow the list down and add the most relevant items to your charter of risks.
Delphi Method
Use the Delphi technique when your project spans multiple locations or requires insights from external experts.
Start by sending structured questionnaires to selected subject matter experts. Collect their responses, summarize them, and send the refined list back for another round of feedback.
Repeat until the answers converge on a clear set of risks.
This iterative classic approach makes it easier to uncover risks during the project lifecycle that the core team may overlook.
SWOT Analysis
A SWOT analysis is a simple but structured method for evaluating a project’s strengths, weaknesses, opportunities, and threats.
To run one, draw a four-quadrant grid and label each section with one of these categories. Involve your team and stakeholders, then brainstorm entries for each box.
For example, a strong client relationship might be a strength that also presents an advantage for upselling, while outdated tools could be a weakness that increases possible hazards in the project.
- Strengths & Opportunities can reveal “positive risks” that are events that could benefit the project if managed correctly.
- Weaknesses & Threats highlight vulnerabilities that need early mitigation.
Keep in mind this is a collaborative method designed to capture diverse perspectives and spot issues that might otherwise go unmentioned.
Predictive Analytics
Predictive analytics uses historical project data and pattern recognition to forecast potential delays, cost overruns, or resource shortages before they occur.
To apply it, gather past performance metrics, feed them into analytical or machine learning tools, and look for trends that signal emerging issues.
For example, if past projects with similar boundaries slipped when a certain resource was over-allocated, the system can flag that situation early in your current project.
You can use predictive analytics to:
- Detect early warning signs of project uncertainties
- Quantify the probability of specific hazards using historical probabilities
- Prioritize risks by ranking them according to calculated likelihood and impact
Combine predictive analytics with traditional methods to strengthen both qualitative and quantitative evaluations of risks.

Productive gives you an early warning if your staff is overbooked.
Monte Carlo Simulations
Monte Carlo simulations help you model uncertainty in complex projects where many variables interact. To use this method, define the key variables that could affect your project, assign probability distributions to each, and run thousands of “what if” simulations using software tools.
The output shows a range of possible outcomes and the likelihood of each, so you can prepare accordingly.
Benefits include:
- Showing the range of possible project timelines or costs.
- Identifying combinations of hazards that have the greatest impact.
- Supporting evidence-based plans for dealing with risks.
This method works especially well for projects with tight budgets or schedules, where even small delays could trigger major impacts.
Productive’s Scenario Builder feature lets you run “what if” budget and resource simulations in a similar way, helping you see the impact of changes before they happen.
You can model different timelines, budget allocations, or staffing options and instantly compare outcomes so you can choose the best plan without guessing.
Risk Audits
A risk audit actively checks whether your risk management process is working and up to date.
To run one, schedule a review meeting, compare your current risk log against actual project conditions, and confirm that all key identification steps are followed.
Look for missing or outdated entries, then update them with accurate details.
When you conduct regular audits, you can:
- Identify gaps in coverage where no risks are documented.
- Remove or revise statements that no longer match reality.
- Spot opportunities to strengthen your current preventive measures.
Identify and manage project risks with Productive
What Are Risk Analysis Methods?
Risk analysis methods are the qualitative evaluation of risks, the quantitative evaluation of risks, risk probability assessment, risk impact evaluation, and risk exposure calculation. These approaches help you move from a simple list of hazards to an informed view of which ones matter most.
Below, we’ll look at each method in more detail.
Qualitative Risk Analysis
Qualitative risk analysis is a method where you rank risks using expert judgment rather than calculations. To apply it, gather your project team and stakeholders, then follow these steps:
1. List all identified risks.
2. Rate the likelihood (e.g., low, medium, high) based on collective expertise and available data.
3. Rate its potential impact on schedule, deliverables, or budget using the same scale.
4. Plot these ratings on a risk matrix to see which risks require the most attention.
Here’s a simple example of a 3×3 risk matrix:
| Low Impact | Medium Impact | High Impact | |
|---|---|---|---|
| Low Likelihood | Monitor only | Monitor only | Monitor closley |
| Medium Likelihood | Monitor only | Plan response | Plan response |
| High Likelihood | Plan response | Act immediately | Act immediately |
Ratings visualization makes it easier to decide where to act first. This method is quick to use and ideal for early prioritization, especially when detailed numerical data isn’t yet available.
Quantitative Risk Analysis
Quantitative risk analysis is how you dig deeper into your risk list using numbers, not just opinions. To apply it, start by defining the probability of each risk and estimating its impact in measurable terms like cost or time.
Then use the formula: Risk Exposure = Probability × Impact to get a clear score for each.
This approach gives you hard data to back up your risk mitigation strategies. It also makes it easier to secure stakeholder support and resources for prevention.
Risk Probability Assessment
Risk probability assessment is how you estimate the likelihood of each possible hazard actually happening.
To apply it, review historical project data for recurring patterns, ask experienced managers or subject matter experts for their judgment, and use a consistent probability scale (typically 0 = impossible, 1 = certain).
Record the probability value for all risks so you can quickly see which ones deserve the most attention. Do this before the quantitative analysis so that you can focus on high-likelihood risks instead of spreading resources too thin.
Risk Impact Evaluation
Risk impact evaluation measures what could happen if the listed risks occurs.
To use it, decide on a scoring system (e.g., 1–5) for potential effects on schedule, scope, cost, or quality. Rate each risk’s impact, then combine it with the probability score from the previous step.
A high-probability, high-impact threat goes straight to the top of your risk register for immediate action, while a low-impact, low-probability event can be monitored with less urgency.
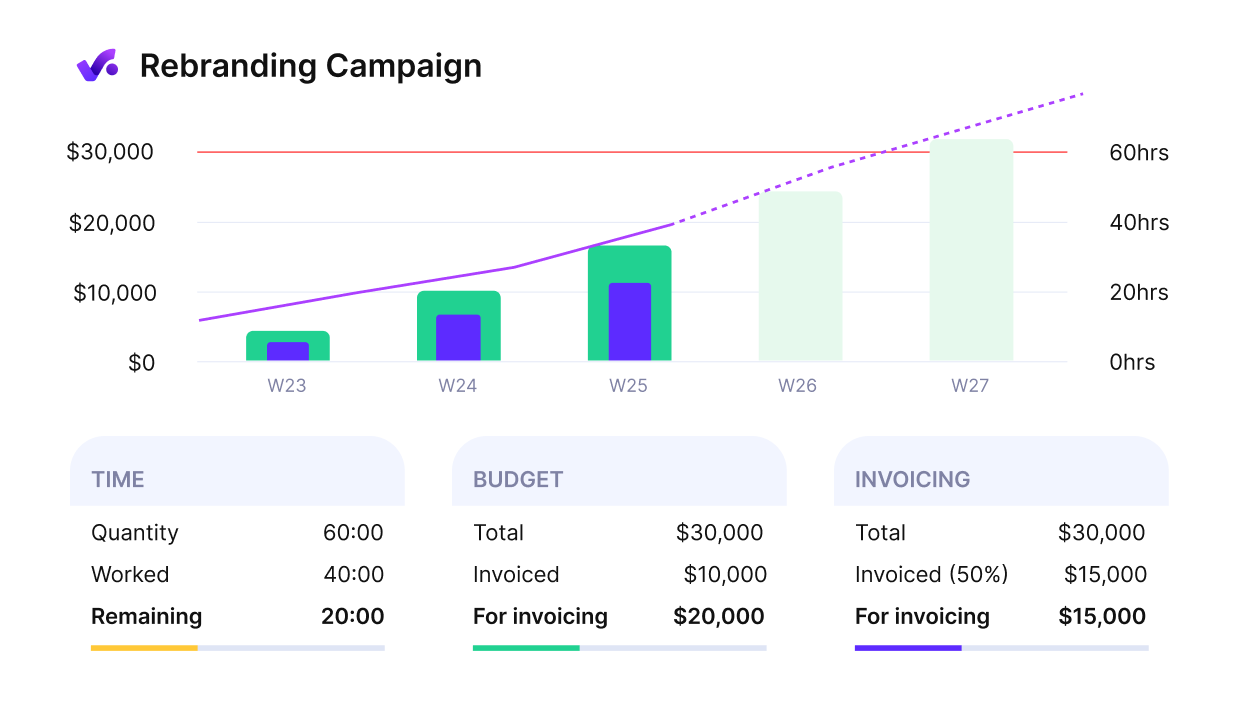
Use productive to Get an early warning of budget overruns.
Risk Exposure Calculation
Risk exposure is a way to give each risk a clear score so you can rank and compare them. To apply it, multiply the probability score by the impact score:
Risk Exposure = Probability × Impact Score.
Sort the results so you can act first on the highest scores. This method is especially useful when resources are limited, as it helps you focus efforts where they will make the greatest difference in your risk management planning.
Risk Identification Process (Step-by-Step Guide)
Identifying project risks is a structured, multi-stage process that moves from broad scanning to writing precise, actionable entries in your charter of risks.
It involves gathering information, challenging assumptions, validating findings, and documenting each risk in a way that supports clear action.
We’ll get more specific in the breakdown below:
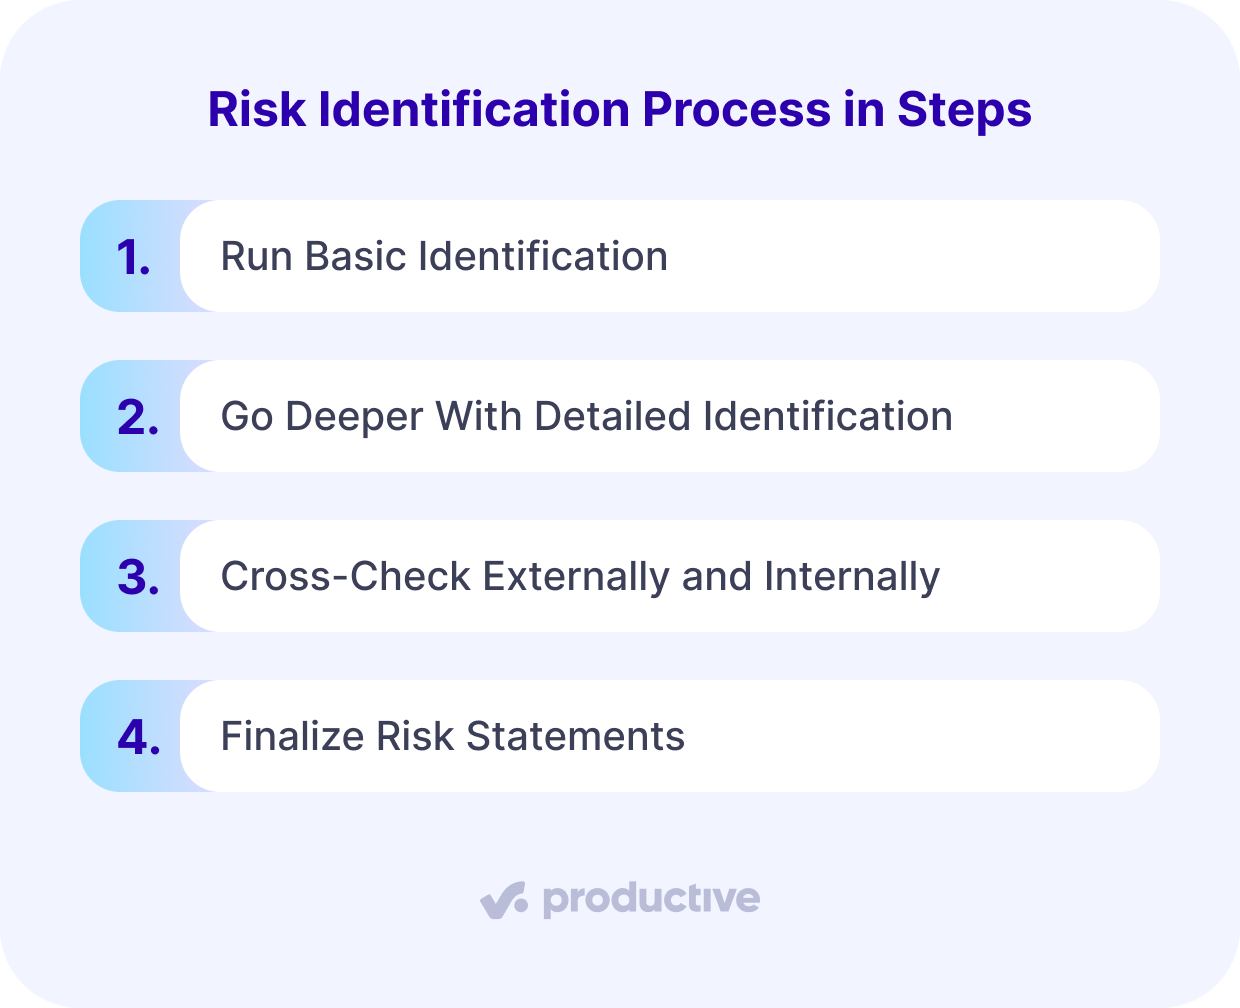
Step 1: Run Basic Identification
Start by gathering all available project information and reviewing key documents like the project plan, scope statement, and contracts.
Look for unclear requirements, aggressive timelines, resource bottlenecks, or dependencies that could create delays.
Then:
1. Run a SWOT analysis to map threats and opportunities. Involve your team and key stakeholders, and fill each quadrant with specific examples.
2. Draft an initial list of risks in your log, even if some entries are rough; getting them captured matters more than perfection.
3. Use ready-made templates to record causes, potential events, and timeframes for each risk.
4. Involve stakeholders early to surface risks during the project lifecycle that you might overlook.
Step 2: Go Deeper With Detailed Identification
Once you have the basics, expand your view:
- Conduct interviews with project sponsors, clients, and team leads to reveal hidden risks.
- Run assumptions analysis to test whether your project’s underlying beliefs hold true.
- Use flowcharts or fishbone diagrams to map cause-and-effect chains. Focus on moving from vague notes to clear risk statements.
Add a risk breakdown here to group similar issues for easier tracking.
Step 3: Cross-Check Externally and Internally
Validate your findings to prevent blind spots:
- External: Compare against industry checklists and market reports.
- Internal: Map each risk to your work breakdown structure to ensure every deliverable has been considered.
Step 4: Finalize Risk Statements
Turn each identified risk into a precise, actionable record in the risk log. Include:
- Cause: Why the risk might happen?
- Event: What will happen if it occurs?
- Impact: How will it effect scope, schedule, budget, or quality?
What Are the Required Inputs for Risk Identification?
The required inputs for risk identification are the project management plan, project documents, enterprise environmental factors (EEFs), and organizational process assets (OPAs).
Here’s a short and clear breakdown table of these inputs, what they should include, and what makes them so important.
| Input | What It Is | What It Includes | Why It’s Important for Risk Identification |
|---|---|---|---|
| Project Management Plan | The master blueprint for the entire project | Scope, schedule, deliverables, key milestones, baseline assumptions, historical lessons | Reviewing it reveals likely scope changes, resource bottlenecks, and budget constraints that could become potential project risks. |
| Project Documents | Supporting materials that add context to the plan | Scope baseline, schedule baseline, risk guidelines, historical records | These documents flag deliverable risks, highlight time constraints, outline risk management expectations, and reveal recurring project uncertainties. |
| Enterprise Environmental Factors (EEFs) | Internal and external conditions affecting the project | Industry regulations, market volatility, company culture, stakeholder risk tolerance | EEFs help you anticipate project lifecycle risks beyond your direct control, like compliance issues or market shifts. |
| Organizational Process Assets (OPAs) | Existing organizational resources for managing projects | Previous risk registers, post-project reviews, established risk identification techniques and templates | Using OPAs speeds up project hazard identification, avoids reinventing the wheel, and reduces the risk of overlooking familiar threats. |
What Are the Emerging Trends in Risk Management?
The emerging trends in risk management are the use of AI-powered tools, real-time monitoring with predictive analytics, and the inclusion of cybersecurity as a standard risk category.
These trends make identifying risks faster, more precise, and more proactive:
- AI tools detect patterns in large datasets, predict schedule slippage, flag potential issues in unstructured notes, and update the risk log automatically.
- Real-time dashboards track project uncertainties continuously, so project teams can respond before problems escalate.
- Cybersecurity risks, such as data breaches, ransomware, and privacy compliance issues, now demand the same attention as schedule, scope, or budget concerns.
Looking ahead to 2025, these capabilities will become standard expectations rather than innovations.
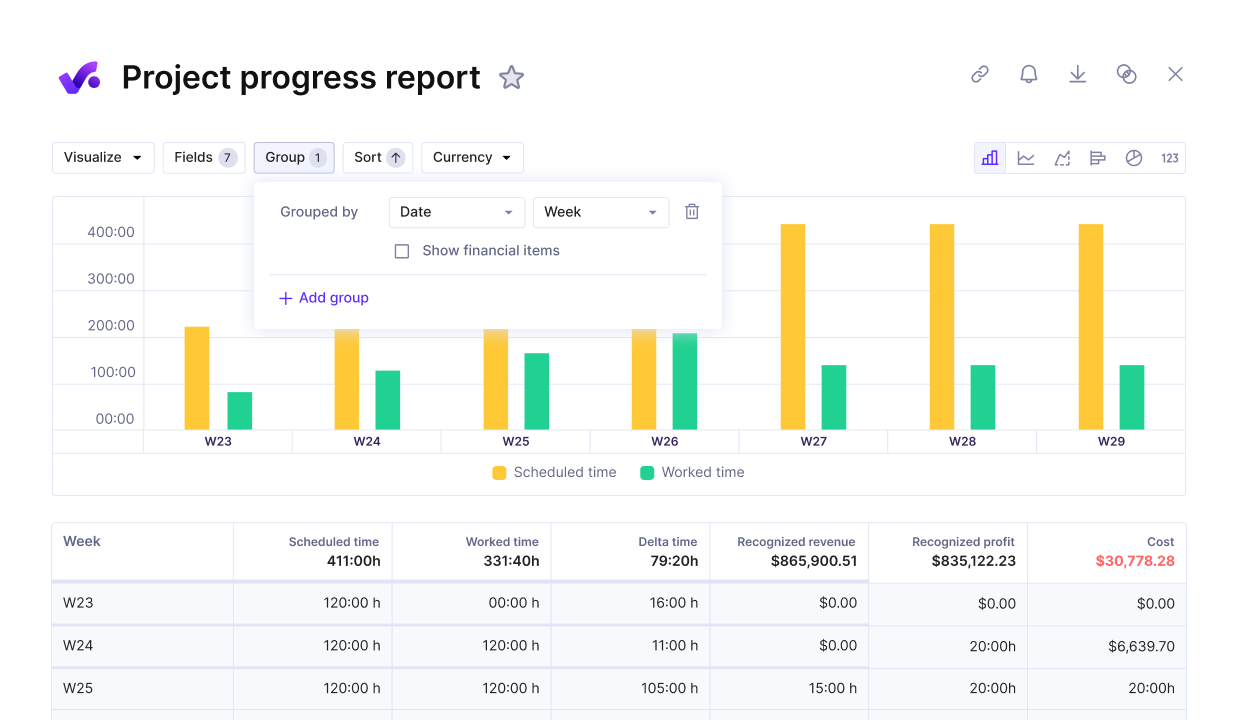
Review project progress against key performance metrics in Productive.
What Are the Common Risk Detection Mistakes (and How To Fix Them)?
The common risk identification mistakes are ignoring small risks, overlooking internal risks, confirmation bias, lack of expert input, and failing to update the risk register.
In the table below, we’ll look at each mistake, its root cause, its impact, and how to fix it.
| Mistake | Root Cause | Impact | How to Fix It? |
|---|---|---|---|
| Ignoring Small Risks | Focusing only on high-impact threats and dismissing minor issues | Minor delays or glitches snowball into major challenges, causing missed deadlines or scope creep | Include low-level risks in your tracking system and review them regularly. |
| Overlooking Internal Risks | Emphasis on external threats while neglecting internal process and capacity issues | Bottlenecks, inefficiencies, and resource misallocations go unnoticed until they disrupt the delivery process | Use integrated tools to track workload, resources, and workflows. Productive’s capacity planning view makes these risks visible early. |
| Confirmation Bias | Preferring information that supports existing beliefs | Missed identification of legitimate issues, reducing the accuracy of assessments | Encourage diverse perspectives and structured workshops. Rotate facilitators and challenge assumptions openly. |
| Lack of Expert Input | Avoiding or skipping specialist involvement | Niche regulatory, technical, or legal risks remain undetected | Budget for expert consultations and document findings in the log. |
| Failing to Update the Risk Register | Treating the risk register as a static document | New threats remain untracked, outdated entries clutter the list, strategies become irrelevant | Schedule periodic reviews and updates. In Productive, set recurring tasks for updates and assign them to responsible owners. |
Free Risk Identification Template
Here’s a simple, copy-and-use project risk identification template you can adapt for your projects:
| Risk ID | Risk Description | Cause | Trigger Event | Probability (Low/Med/High) | Impact (Low/Med/High) | Mitigation Strategy | Owner | Review Date |
|---|---|---|---|---|---|---|---|---|
How to Use This Template?
1. Risk ID – Assign a unique identifier for tracking.
2. Risk Description – Write a short, clear risk statement.
3. Cause – State why the risk might happen.
4. Trigger Event – Describe what would signal that the risk is occurring.
5. Probability & Impact – Rate each on a Low/Medium/High scale.
6. Mitigation Strategy – Outline how you’ll reduce or respond to the risk.
7. Owner – Assign someone in your organization to be responsible for monitoring and action.
8. Review Date – Set a date to re-evaluate the risk.
Risk Detection Example
| Risk ID | Risk Description | Cause | Trigger Event | Probability (Low/Med/High) | Impact (Low/Med/High) | Mitigation Strategy | Owner | Review Date |
|---|---|---|---|---|---|---|---|---|
| R-001 | Delay in design approval | Client unavailable for feedback | Approval request unanswered for 5+ days | Medium | High | Schedule early review meetings, set reminders in Productive | Project Manager | 2024-06-15 |
This template will help you capture all critical details in one place and keep responsibilities clear.
If your team works in Productive, you can store and update this table directly on tasks (as Google Sheets or .xlsx file attachments), then link those tasks to specific projects, and set automated reminders for review dates.
Closing Thoughts
Effective identification of possible risks is an ongoing process that keeps projects resilient by catching hazards early, turning advantages into measurable gains, and allocating resources where they matter most.
Productive helps by linking risks directly to projects, tracking them in real time, assigning owners, and setting automated review reminders so nothing slips through the cracks.
Book a 30-minute demo to see how Productive helps your team identify and address risks before they escalate.
Enhance Risk Management With Productive
Track of every project risk and deliver on time and budget with an all-in-one project management tool.
