Project Scheduling in Project Management (Step-by-Step Guide)

Most projects don’t miss deadlines because teams lack effort. They miss deadlines when work isn’t sequenced, resourced efficiently, or kept in a clear, updated plan. Project scheduling in project management addresses this by providing a manageable timeline.
In this guide, you’ll learn what project scheduling is, why it’s essential, and how to build a project schedule step by step. You’ll also learn about the most common scheduling techniques and how scheduling software can support you day to day.
Key Takeaways
- Update your schedule regularly once the project starts: use it to guide your work daily, communicate clearly, and manage project risks early.
- Compare resource demand to resource availability before you delegate tasks: subtract holidays and time off, then confirm the team members can cover the work.
- Analyze your schedule with CPM and PERT, then visualize it in a Gantt chart: CPM shows the longest chain of dependent work, and PERT helps you plan around uncertain durations.
- Use project management software to maintain a single source of truth: connect the schedule to utilization, forecasting, and reporting in one place.
What Is Project Scheduling in Project Management?
Project scheduling in project management is the process of creating a structured schedule that lists your project tasks.
In practice, project scheduling answers the questions that set the foundation of a project:
- What work needs to happen?
- Who is responsible for each task?
- What needs to be finished before the next task can start?
- What are the key project milestones we need to hit?
You’ll use the project schedule to keep your team members aligned, especially when priorities change during the week (because of course they do).
Next, let’s look at why project scheduling is so crucial for on-time delivery and avoiding constant firefighting.
Why Is Scheduling Essential for Project Management Teams?
Scheduling is essential for project management teams because it helps control costs, enables clearer communication, and improves risk management. We will take a closer look at how:
Helps Control Costs
Cost creep, a slow, often unnoticed rise in spending, usually starts with time creep. Extra hours and review cycles add up, leading to budget overruns. A realistic schedule helps spot these issues early and highlights where you may need to adjust project scope or resource management.
Enables Clearer Communication
A good schedule gives everyone a shared view of priorities and timing. This makes coordination easier and keeps progress clear for project stakeholders. You can quickly show what comes next on the project timeline and what might be holding things up.
Improves Risk Management
Scheduling makes risk management practical by showing where your plan is most vulnerable, so you can add buffers, adjust reviews, or change resource planning to protect deadlines.
Now that you know why scheduling matters, let’s look at the steps to build a project schedule you can actually use.
What Are the Steps To Create a Project Schedule?
The steps to create a project schedule are: develop the work breakdown structure, define work packages and activities, define dependencies, define resources, define the timeframe, and analyze the schedule.
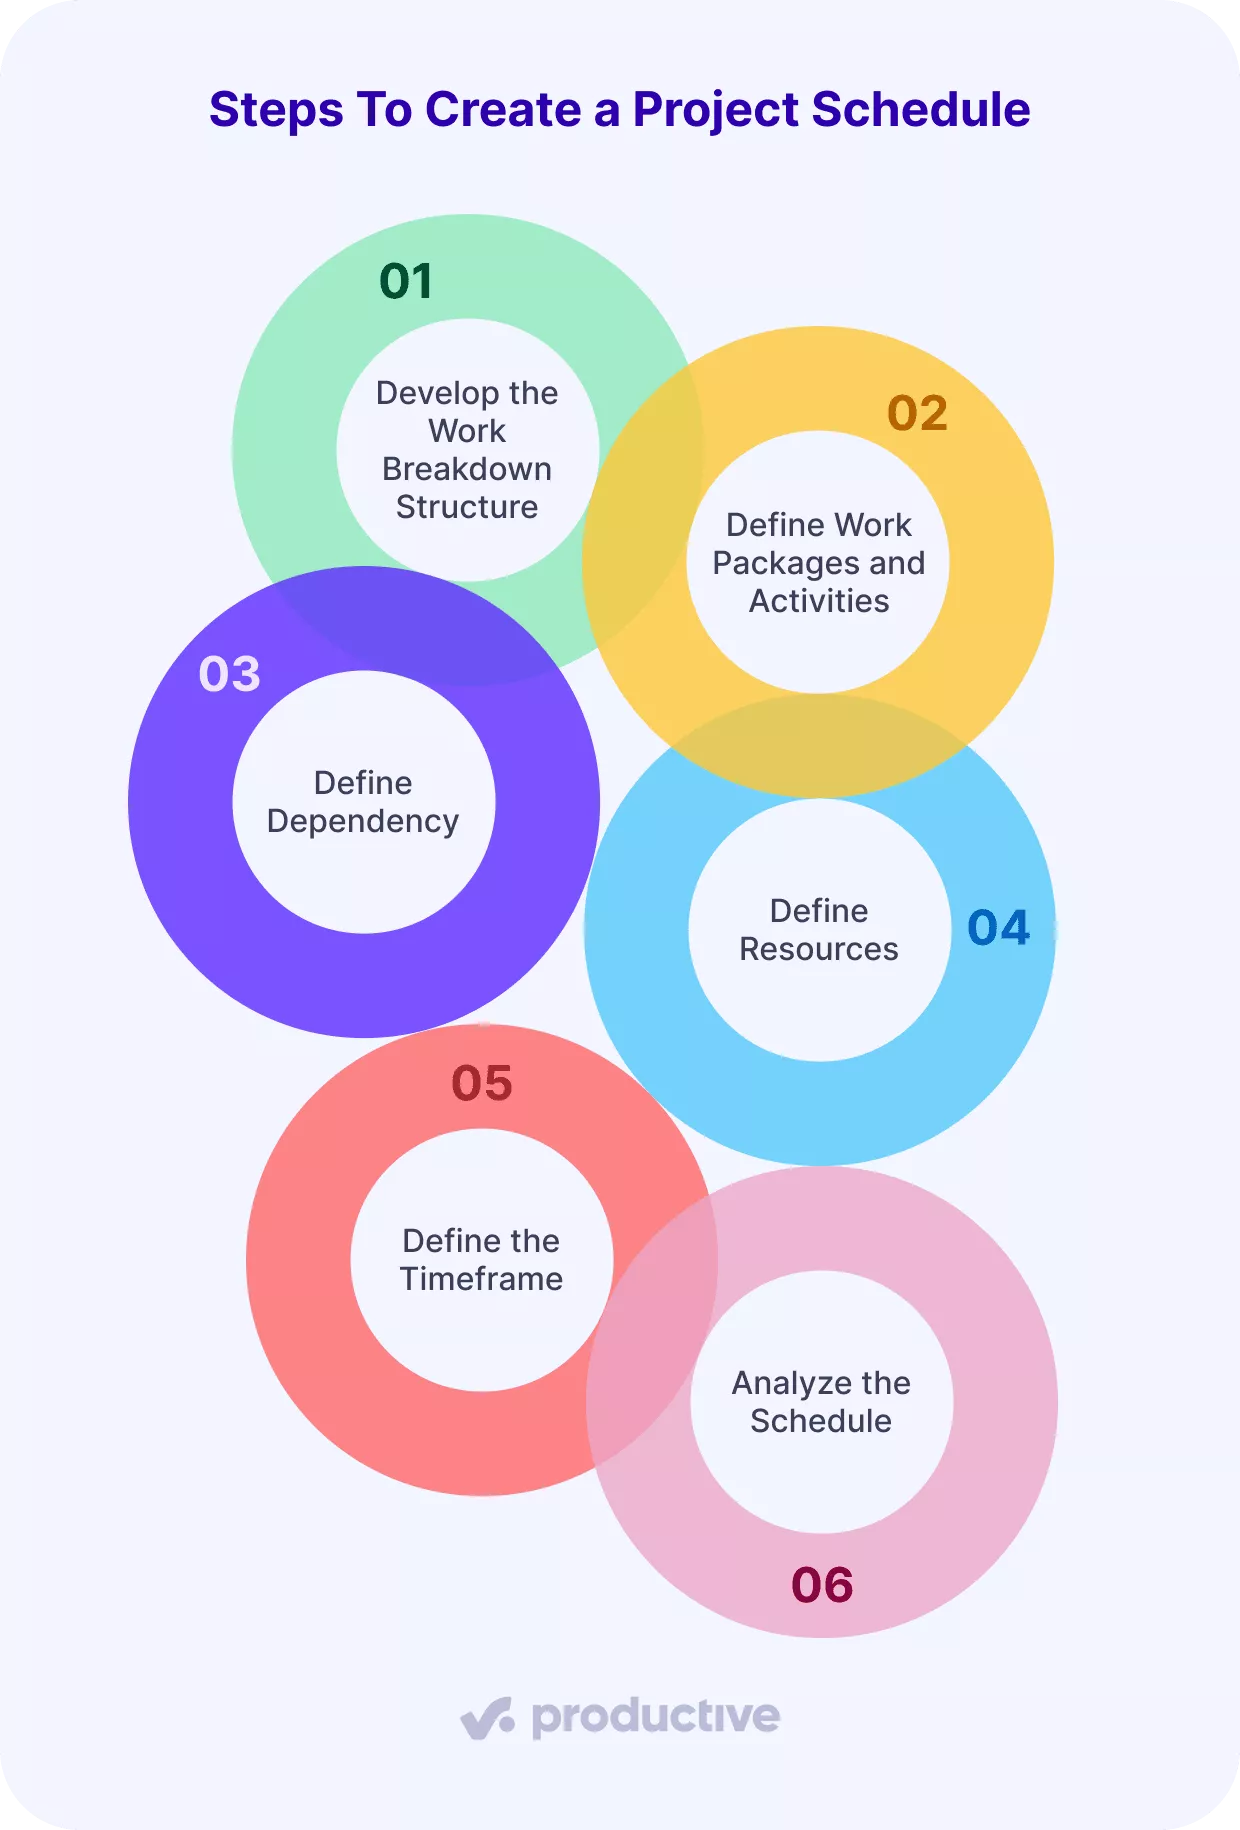
This scheduling process follows the PMI Scheduling 101 article. We’ll examine the specifics of each step so you can build a reliable schedule with certainty.
Step 1: Develop the Work Breakdown Structure
A work breakdown structure (WBS) in project management is a hierarchical blueprint that breaks complex goals into manageable components.
At its core, a WBS starts with your project goal at the top, then branches into major deliverables and sub-deliverables until you reach specific work packages. Before you move on, decide which WBS type you’ll use for your schedule:
A deliverable-based WBS organizes your project around specific outcomes or products, breaking down the work into smaller components that contribute to the final goal.
A phase-based WBS structures your project into sequential stages, making it effective for projects that follow a linear progression from initiation to completion.
Step 2: Define Work Packages and Activities
Next, break the WBS down into work packages, then list the activities inside each one.
A work package is the lowest level of detail in the WBS. You’ll usually need several work packages to complete one higher-level element, and together they should cover all the work required to finish that element.
Write work packages in a clear verb-noun format that shows the action and the item, like “Draft email sequence” or “Design landing page layout.”
Activities are the individual actions inside a work package. Each one should describe a real action a team member can take, estimate, and clearly track through statuses such as backlog, setup, in development, and finished.
Step 3: Define Dependencies
Put the activities in sequence and capture what depends on what. This is also where it helps to separate two similar ideas: task dependencies and logic.
A dependency is the underlying need or condition that connects two tasks. For example, you can’t run a design review until the client gives feedback. Task dependencies can be internal (within your team) or external (requiring someone else to complete a task before you can proceed).
Logic is how you represent that dependency in the schedule, using a relationship type.
Four common logic types are:
- Finish-to-start (FS): Task B can begin only after Task A is fully complete.
Example: You can’t start “Write the landing page” until “Client approves the messaging” is finished. - Finish-to-finish (FF): Task B can start earlier, but it can’t be completed until Task A is completed. Both tasks often run in parallel and finish at the same time.
Example: “Proofreading the blog post” can start while “Editing the blog post” is still happening, but it can’t finish until the edits are complete. - Start-to-start (SS): Task B can begin only after Task A starts. After that, both tasks usually move forward at the same time.
Example: Once “Content production” starts, “Internal review” can begin as well, and both move forward in parallel. - Start-to-finish (SF): Task B can’t be completed until Task A has started.
Example: You keep the old landing page live until the new one goes live. This relationship is rare and easy to confuse, so it’s usually avoided unless there’s a very specific reason to use it.
Step 4: Define Resources
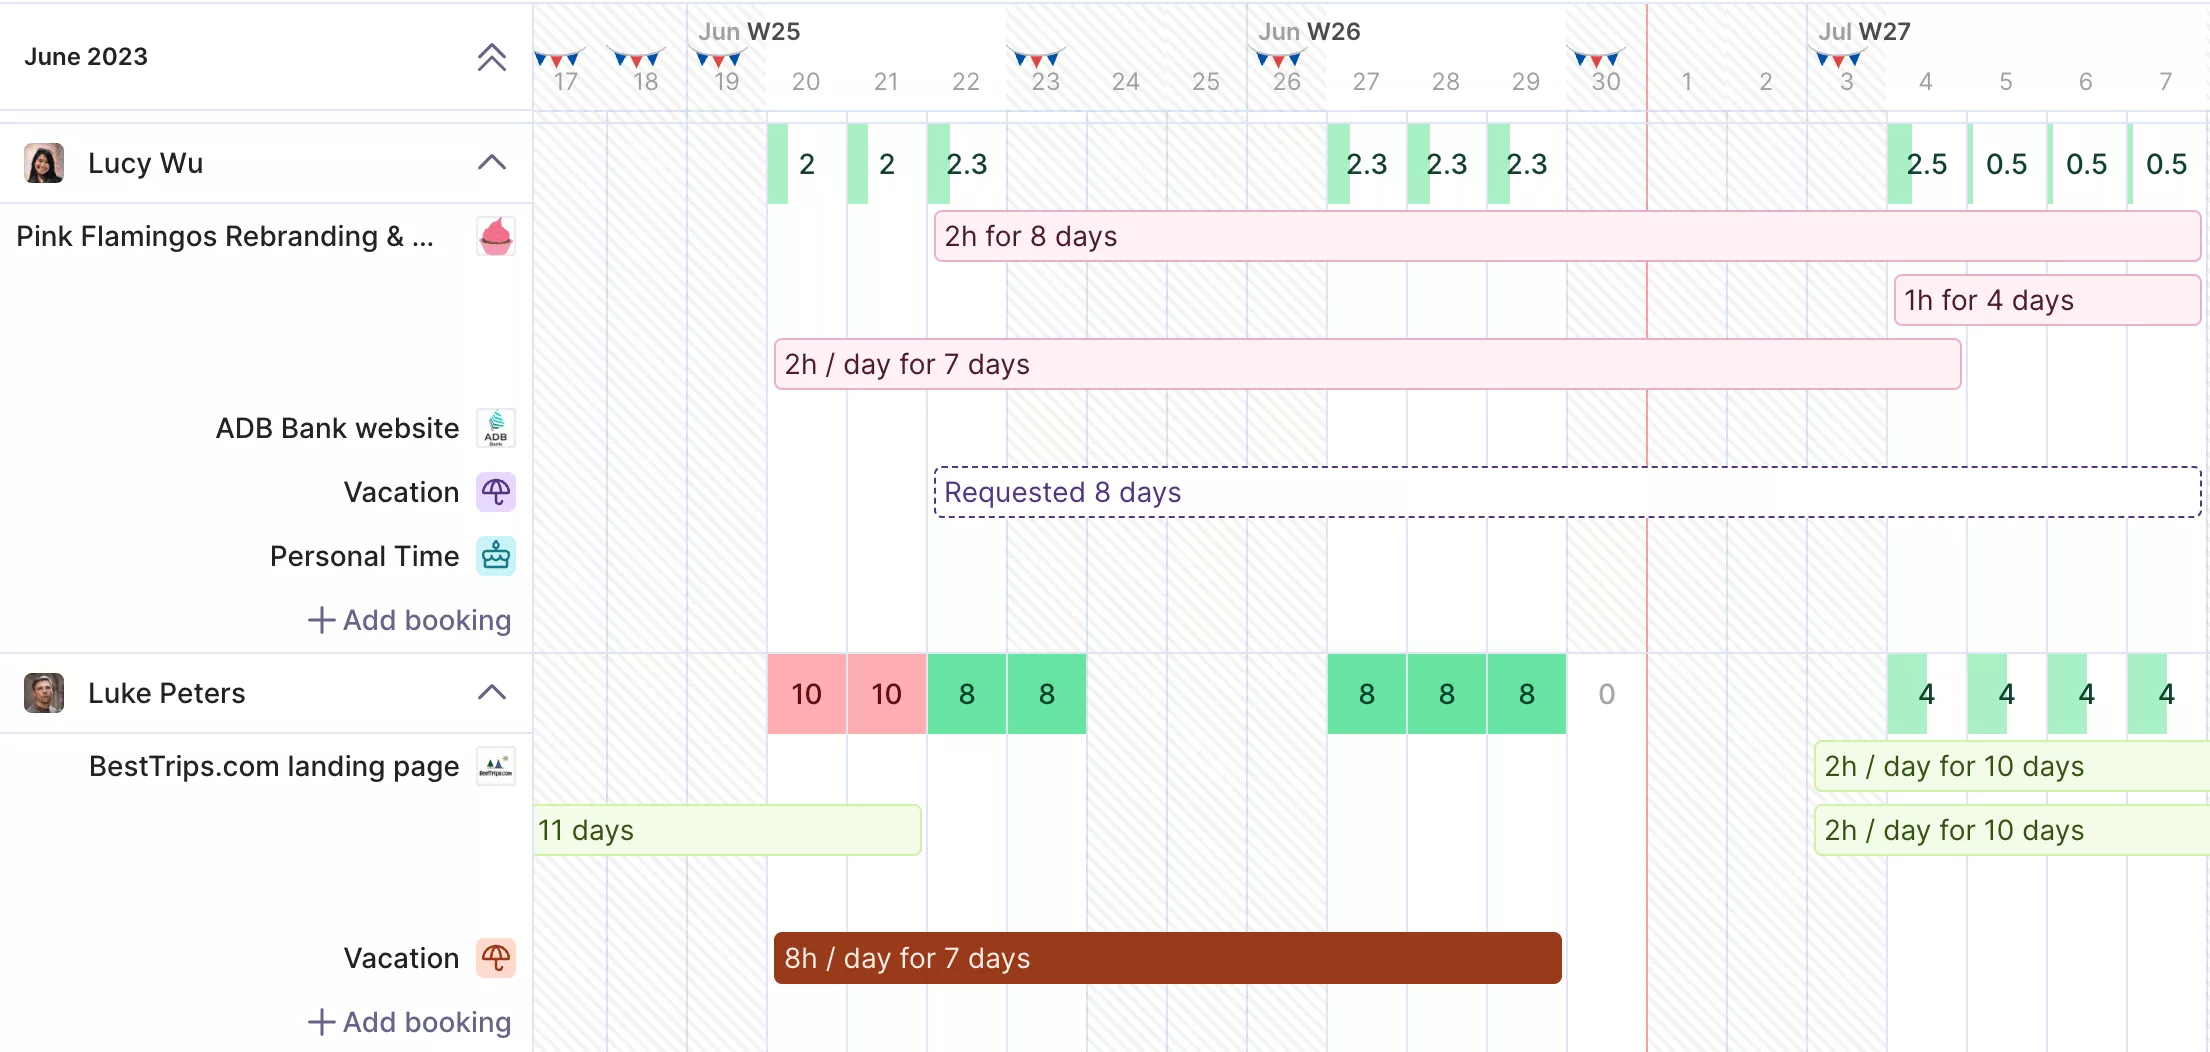
Defining resources is about matching the work to real people. The goal is simple: compare resource demand (the total hours of scheduled work your project schedule requires) with resource availability (the hours your team members can actually deliver).
If you plan only around contracted hours and ignore national holidays, sick days, or last-minute changes, your availability estimate will look better than it actually is.
Use each team member’s daily hours, subtract national holidays and time off, and get availability. Then compare that availability to your resource demand. If demand exceeds availability, you have three options: move dates, reduce scope, or add help.
If “add help” is the right call, plan it explicitly. Add a placeholder to your resource plan in Productive to reserve capacity for a role that’s not yet part of your organization, then schedule it against the project work. That makes the gap visible early, so you can decide whether to recruit, hire a contractor, or
USE PRODUCTIVE TO ADD PLACEHOLDERS IN RESOURCE PLANNER.
Assign the placeholder an expected cost (like a salary), set a working capacity, and book it against services.
Manage resource planning in Productive
Step 5: Define the Timeframe
The second-to-last step in building your schedule is to define the durations of the activities. This enables you to see how long the work will take and what mix of resources you’ll need to complete it.
One simple lesson from the PMI article: if you schedule every activity with a single duration, you’re basically accepting a 50/50 chance of actually meeting the deadline.
A simple way to make durations more realistic is to use a weighted estimate based on a three-point range. Start by estimating:
- Optimistic: the duration if things go smoothly
- Most likely: the realistic duration
- Pessimistic: the duration if you hit common delays
The formula for the weighted estimate is:
PERT Weighted Estimate = (Optimistic + 4×Most Likely + Pessimistic) / 6.
We’ll cover PERT in more detail later in the scheduling techniques section.
Step 6: Analyze the schedule
Now the project schedule is complete. Next, check whether what you planned actually holds up.
First, confirm you meet your contractual obligations. Check committed dates, required project milestones, and any delivery commitments you can’t miss. Then run a quick schedule analysis.
In the next section, we’ll cover two common project scheduling techniques teams use to analyze a schedule (the critical path method and PERT), plus how Gantt charts help you visualize the project timeline.
What Are the Most Common Project Schedule Management Techniques?
The most common project schedule management techniques are the critical path method and PERT. Teams use them to analyze a schedule and confirm that the project timeline makes sense. Then they use Gantt charts as the visual layer to display the work, dependencies, and dates in a single view.
Next, we’ll break down each one so you know what it does and when to use it.
Critical Path Method
The Critical Path Method (CPM) is a project management technique for finding the longest sequence of dependent tasks. That critical path dictates the minimum time to complete the project and highlights the essential activities you can’t delay without pushing the deadline back.
PERT
PERT (Program Evaluation and Review Technique) is a project management technique and statistical method you use when activity durations are uncertain. Teams often use PERT alongside the Critical Path Method (CPM).
It builds on three-point estimates and maps tasks, project dependencies, and timelines in a network diagram called a PERT chart.
A PERT chart is a network diagram in which nodes (often shown as circles) represent project milestones, and arrows represent the tasks that connect them.
Gantt Charts
Gantt charts are timeline charts that display tasks and their connections using horizontal bars. Connecting lines show how tasks depend on each other, making it easy for project managers to visualize the project’s workflow and sequence.
Project managers use Gantt charts to track progress, allocate work, and manage deadlines through a clear visual view. When something shifts, the Gantt chart helps you see what work it affects next.
Productive’s Gantt-style view connects scheduling with resourcing and budgets, so you see the whole picture in one place.
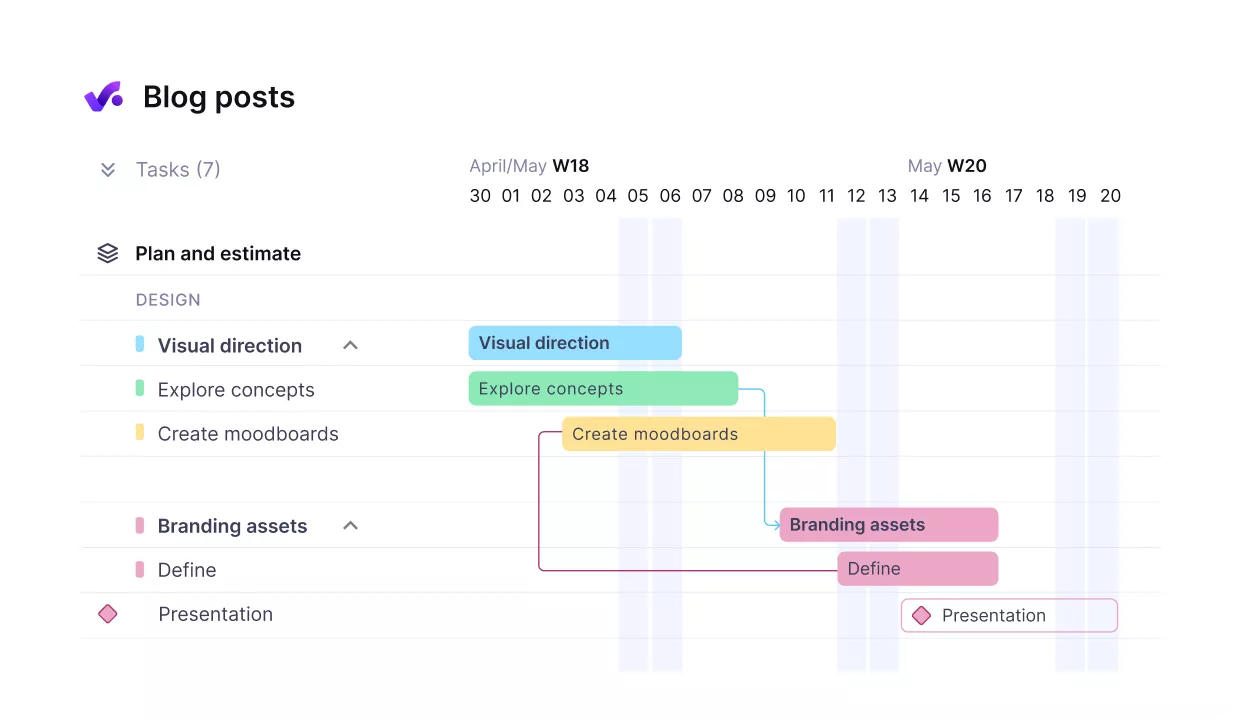
USE PRODUCTIVE’S GANTT CHART TO MANAGE YOUR DEPENDENCIES.
Use the timeline to map phases and deadlines, link tasks to spot blockers, and compare planned vs actual hours with time tracking.
Want to explore more options? We’ve also compiled a list of Gantt chart software you can check out.
How Does Project Management Software Help?
Project management software helps by connecting budgets, time, and scope; it uses utilization for financial forecasting, and it powers real-time reporting. Next, we’ll break down each feature.
Connect Budgets, Time, and Scope
A good scheduling tool keeps budgets, time, and scope connected in one place. It lets you compare estimated vs actual hours as work happens, track budget by phase, and spot scope creep before it quietly turns into a missed deadline.
Tools like Productive support this by bringing your projects, time tracking, and budgets together in one view.
Use Utilization for Financial Forecasting
Your schedule shows how many hours you plan to deliver and when, which is the backbone of most forecasts.
Billable utilization is one of the most useful signals in that forecast. It shows the share of scheduled time you can invoice a client for.
Productive helps you see utilization across teams and individuals, and forecast utilization for upcoming work, so you can spot gaps before you commit to dates.
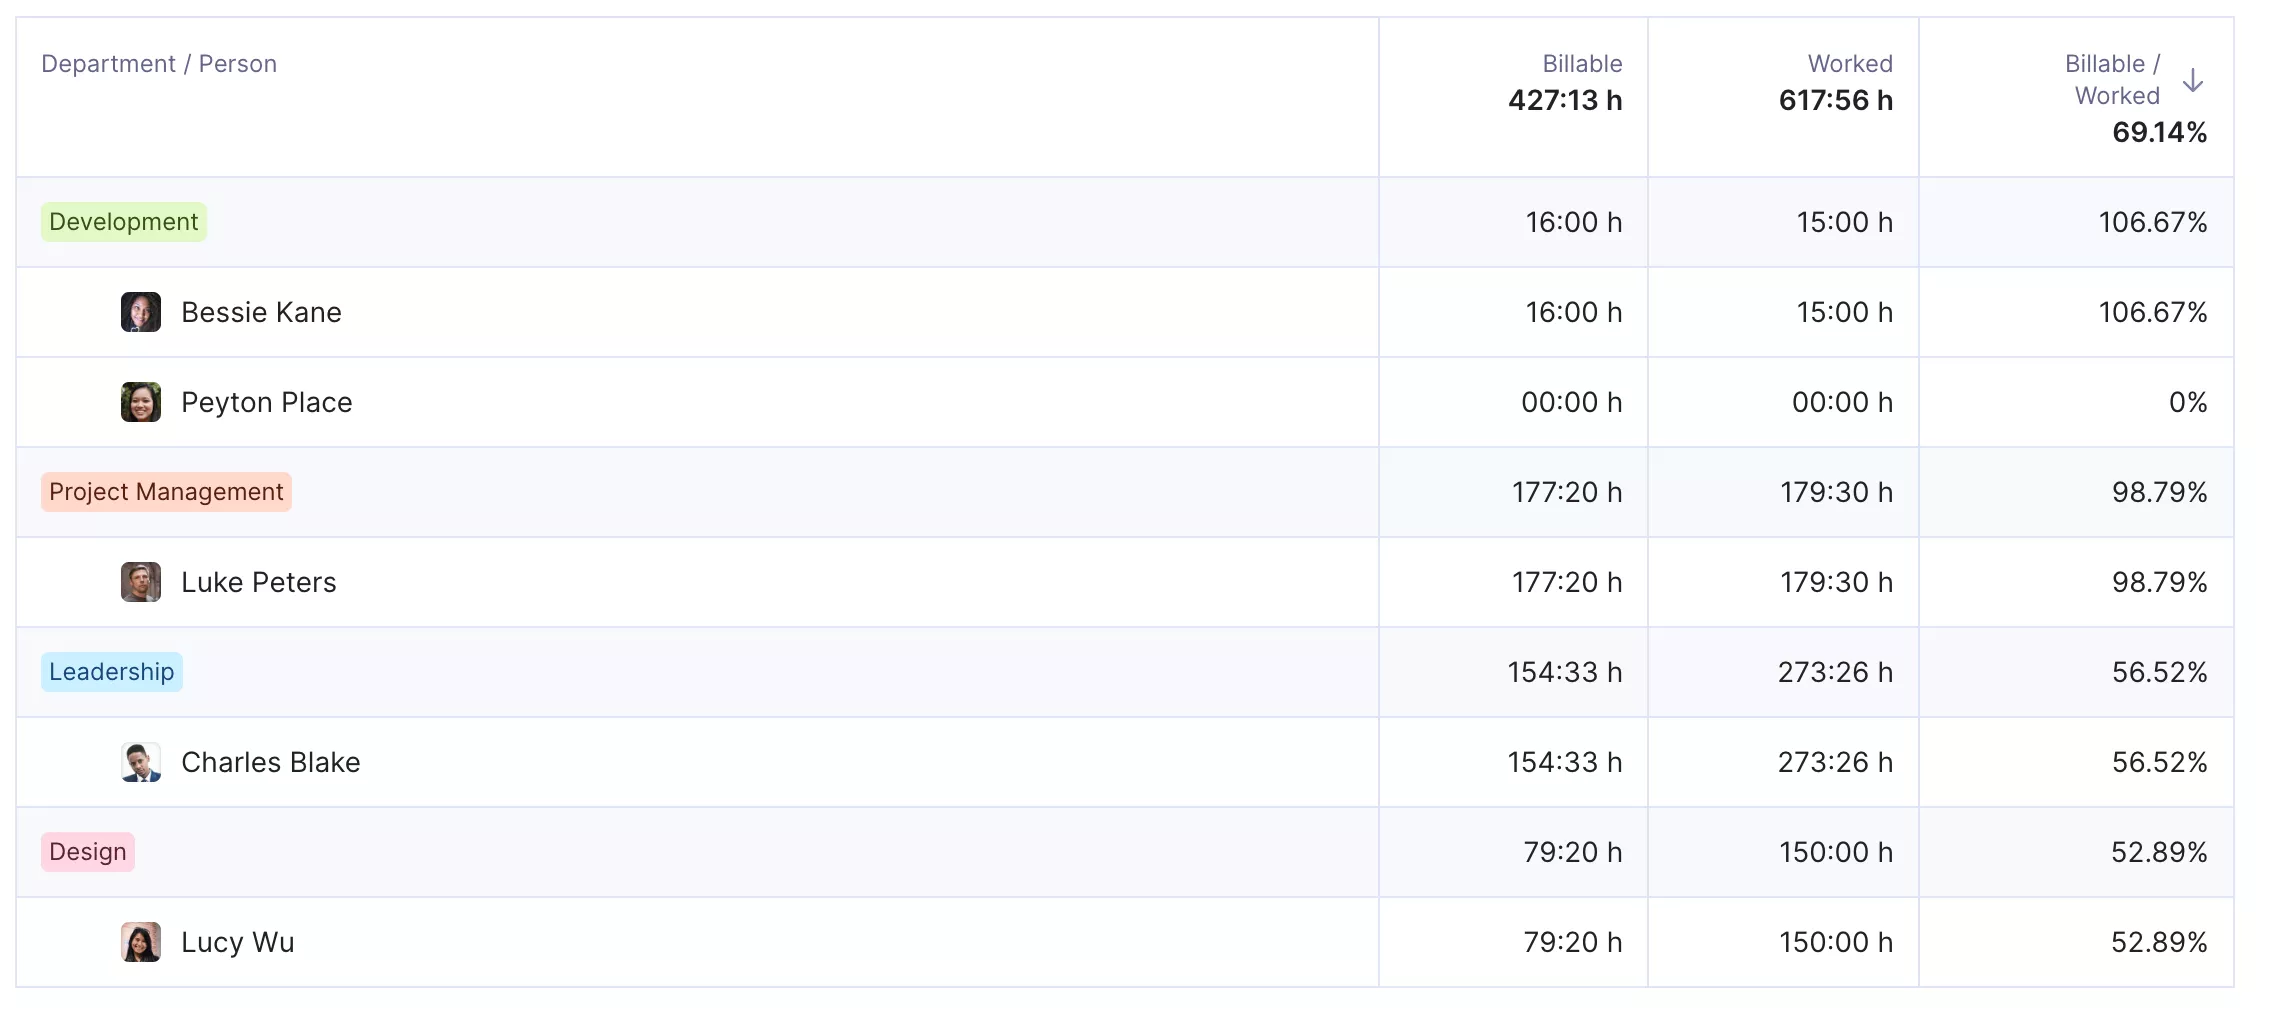
FORECAST UTILIZATION WHILE PROJECT PLANNING WITH PRODUCTIVE.
Here’s how one customer described the impact of using scheduling as the source for forecasting:

What’s nice about Productive is now we use scheduling as an actual data resource to create our financial forecasts. So no more manual work, which is really nice and it gives everybody an extra push to make sure that their scheduling is accurate because it’s the basis of the financial forecast. So, if you want an accurate financial forecast, you should have accurate scheduling. We’re really happy with that.
Read how Makerstreet keeps everything on track, all in one place with Productive.
Powers Real-Time Reporting
A schedule isn’t just created before kickoff; it’s a tool you use throughout the project to track progress, update dates when plans change, and show what’s moved and why. That’s why reporting is crucial.
Good software lets managers see key metrics in real time without manual work.
In Productive, you can build AI reports instantaneously, for example:
- Projected revenue for next quarter
- Absence report for the last six months
- Utilization by team or person
- Profitability per project
Final Thoughts
A project schedule is essential for guiding delivery, managing risk, and maintaining clear communication. It only works when you keep the schedule up to date as work changes. That’s why the right software matters. It keeps the timeline, resourcing, and financial signals connected.
Productive brings project management, resourcing, time tracking, budgets, and AI reporting into one digital workspace, so you can plan work and see the impact without stitching data together.
Book a demo with Productive to see it in action.
FAQ
What Is the Purpose of the Project Scheduling Process?
The purpose of the project scheduling process is to give you practical guidance for project delivery by showing what needs to happen, in what order, and by when.
What Are Scheduling Techniques?
Scheduling techniques are methods you use to analyze whether a project schedule is realistic and defensible. The two most common scheduling techniques are the critical path method and PERT.
What Are Common Scheduling Mistakes?
Common mistakes include underestimating tasks, ignoring project risks by skipping buffers for approvals, or assuming resources are always available when they are not.
What Are the Three Types of Project Schedules?
The three most common project schedules are summary, detailed execution, and milestone schedules.
A master project schedule provides leadership with a high-level view of project phases, key dates, and overall timing. It’s helpful for alignment, not day-to-day control.
A milestone schedule focuses only on key decision points and deliverables. It’s often used for stakeholder reporting and governance.
A detailed execution schedule breaks work down to tasks, dependencies, and assignments. This is the schedule the team actually runs and is the most detailed.
Schedule your whole project in one place
A schedule only helps if it stays current. Productive links your timeline with time tracking and budgets, so changes stay visible and decisions remain grounded.
