Project Scheduling Explained – Steps, Techniques, & Tools (2026)

Project scheduling is deciding what needs to be done, in what order, and when it can realistically be delivered. The basics may seem obvious, but teams often overlook them, especially when people are spread across multiple projects or new requests come in after everything is set.
In this guide, you’ll learn what a project schedule is, how to build one step by step, best practices to follow, and the top tools to help you schedule.
Key Takeaways
- Use a Gantt chart: visualize the work order and see instantly how shifting tasks affects the project timeline.
- Manage resource utilization: track employee workloads with software to assign work to the right people at the right time.
- Create multiple project scenarios: experiment with who does the work, when they start, and the cost to find the best path forward.
- Update the project schedule in real time: use the right tool to keep the task list, time tracking, and resources all in one place.
What Is Project Scheduling?
Project scheduling is the process of creating a structured plan that outlines your project tasks, when they need to occur, and who is responsible for each piece of work.
You can think of it as a living document that guides your decisions when priorities shift midweek, project scope changes occur, or project dependencies slip; situations that arise in almost every project.
These are the essential questions that shape any project schedule:
- What are the specific tasks to be completed?
- Who is responsible for each one?
- Are there any tasks that must be finished before others can begin?
- Which milestones are truly critical?
Furthermore, project scheduling in project management offers multiple important benefits:
- Enables you to spot overload early and reduce project risk
- Makes task dependencies visible
- Keeps communication clear and transparent
- Helps control costs
For a schedule to be truly useful, it requires the right components. That’s what we’ll cover next.
What Should a Project Schedule Include?
A project schedule should include deliverables, tasks, durations and dates, dependencies, project milestones, resource allocation, and budgets.
Let’s break down each of these components:
- Deliverables: the agreed outcomes that the project is expected to produce. Clear deliverables make scope tangible and give the schedule a reason to exist beyond dates.
- Tasks: the individual pieces of work required to produce each deliverable. Well-defined tasks reduce ambiguity, make estimating easier, and create a clearer view of progress.
- Durations and dates: an estimate of how long tasks take and when they sit on the calendar. This turns effort into a timeline and reveals where availability and overlap affect timing.
- Dependencies: the relationships that determine task sequence, handoffs, and prerequisites. Dependencies show what truly blocks work, including external inputs like approvals, content, or access.
- Project milestones: key checkpoints that represent meaningful progress, such as sign-offs, handovers, or phase completion. Milestones help stakeholders read the schedule quickly without scanning every task.
- Resource allocation: how work is distributed across people and time. This highlights feasibility, especially when specialist roles are shared across multiple projects.
- Budgets: the time or cost constraints that limit how much work can be done. Budgets connect the schedule to commercial reality and make tradeoffs visible when plans change.
Only when all these parts are incorporated is the schedule trustworthy. The next step is to turn these pieces into a working plan you can actually follow day to day.
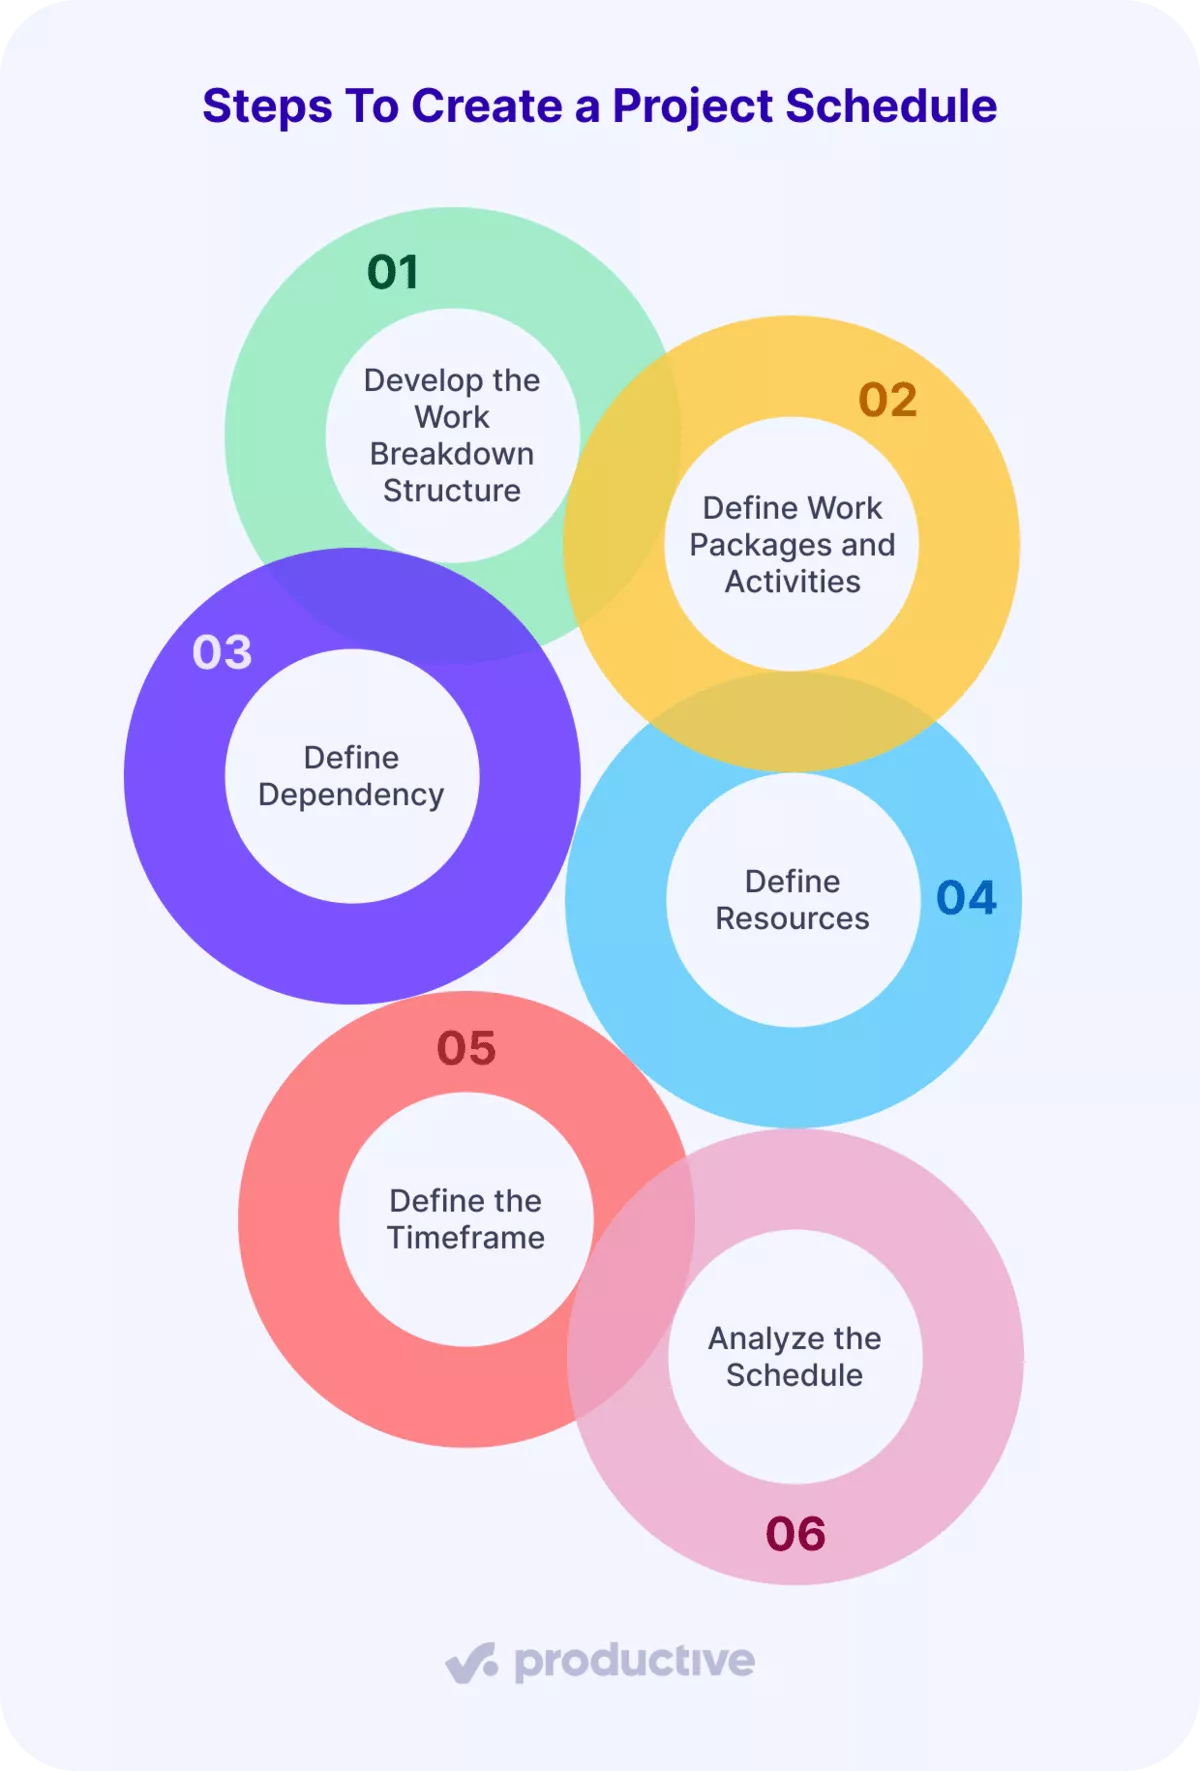
What Are the Steps To Create a Project Schedule?
The steps to create a project schedule are: develop the work breakdown structure, define work packages and activities, define dependencies, define resources, define the timeframe, and analyze the schedule. This scheduling process follows the PMI Scheduling 101 article.
We’ll now examine the specifics of each step so you can build a schedule with certainty.
Step 1: Develop the Work Breakdown Structure
A work breakdown structure (WBS) is a hierarchical method in project management used for breaking a project into smaller, manageable pieces. This approach allows you to plan, estimate, and schedule the work effectively, ensuring nothing important gets overlooked.
This step is essential because it makes the full project scope visible before you start assigning dates or resources.
In practice, teams typically choose one of two WBS approaches:
- Deliverable-based WBS: Organizes work around outcomes, such as features, reports, or launch assets, making it easier to track progress against what you are actually delivering.
- Phase-based WBS: Structures the project into stages, like discovery, design, development, and QA, which is effective when the project follows a linear flow.
Both approaches are valid. The key is to select a structure at the start and stick with it. That consistency gives your project schedule a stable foundation, rather than one that shifts as work unfolds.
Step 2: Define Work Packages and Activities
Once your work breakdown structure is in place, the next step is to break the project goal into detailed work packages and activities; this is a key part of bottom-up estimation.
A work package is the lowest level of detail in the WBS. It represents a complete chunk of work that is small enough to estimate, schedule, and assign with confidence. You will usually need several work packages to complete one higher-level deliverable or phase.
Activities sit inside each work package. These are the specific actions a team member performs to complete the work package.
Step 3: Define Dependencies
Once you’ve listed your activities, arrange them in the order they actually need to happen. Dependencies show what must be finished before the next step can begin.
There are two ideas to keep in mind:
- Dependency: the underlying need or condition that connects two tasks. For example, you can’t start building until the client signs off on the final designs.
- Logic: How you represent that dependency in the schedule, using a task relationship type.
The four logic types are: - Finish-to-start (FS): Task B starts only when Task A finishes.
Example: “Build landing page” begins after “Approve final design”. - Finish-to-finish (FF): Task B can start earlier, but it can’t be completed until Task A is completed. Both tasks often run in parallel and finish at the same time.
Example: “Final QA review” can begin while “Development bug fixes” are still in progress, but it can’t be completed until all fixes are done. - Start-to-start (SS): Task B can begin only after Task A starts. After that, both tasks usually move forward at the same time.
Example: Once “Campaign concepting” begins, “Visual design exploration” can start in parallel using early ideas. - Start-to-finish (SF): Task B cannot finish until Task A starts.
Example: You keep the old campaign live until the new campaign launches. This one is rare; use it only if truly needed.
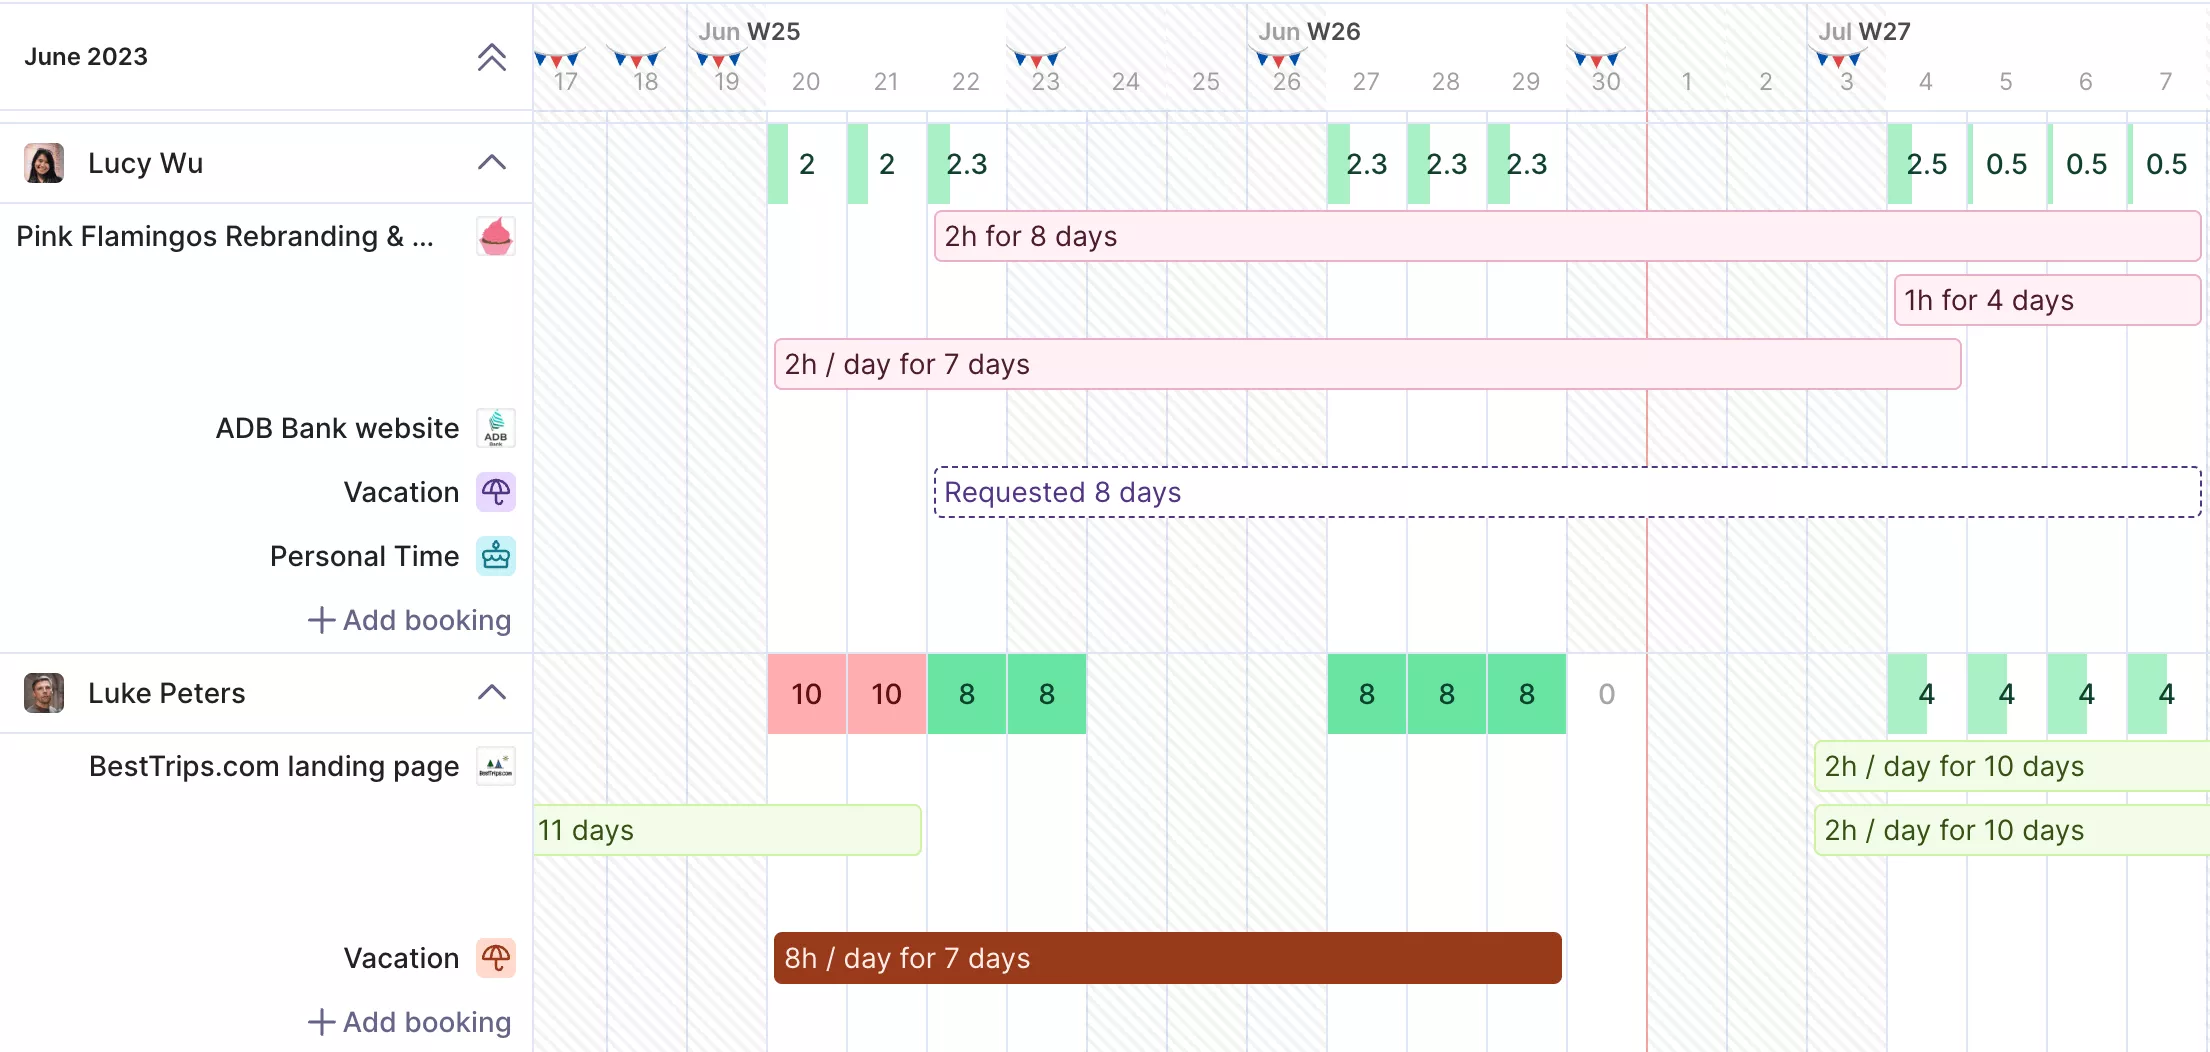
Step 4: Define Resources
Defining resources means linking the work in your schedule to the actual people who will do it, taking real-world constraints into account.
To do this effectively, compare resource demand (the total hours your project needs) with resource availability (the hours your team members can actually deliver).
If you only consider contracted hours and ignore holidays and sick days, resource planning won’t reflect reality, and you’ll quickly run into a multitude of problems.
This is where the right project management software is essential. Productive’s resource planner shows scheduled time, total capacity, time off, and sick leave in a single view. Instantly spot who’s available and assign work accordingly.
GET A REAL-TIME OVERVIEW OF YOUR RESOURCE SCHEDULE WITH PRODUCTIVE.
Turn on capacity indicators and color-coded heatmaps to easily see if someone is overloaded. Adjust allocations or timelines with a simple drag-and-drop.

We use Productive to care for our employees, which has been an important contributing factor to having a 98% retention rate this past year.
Step 5: Define the Timeframe
Now that resources are set, turn your task list into a practical project timeline and estimate the time required. Don’t treat the durations as exact; estimates often have uncertainty, especially with new or complex work, or when others are involved.
The aim isn’t to predict the future perfectly, but to choose timeframes that fit how work actually happens. Build a schedule flexible enough to handle changes without falling apart. We’ll cover ways to manage uncertainty in the scheduling techniques section.
Step 6: Analyze the Schedule
Once your schedule is built, take time to check it. Begin with the non-negotiables: double-check that contractual dates, key milestones, and delivery commitments align now that every task, dependency, resource, and duration is included.
This quick review helps you catch weak points early and decide whether the schedule is ready or needs tweaks before work starts. To help with this, we’ll look at common techniques teams use to analyze and refine project schedules.
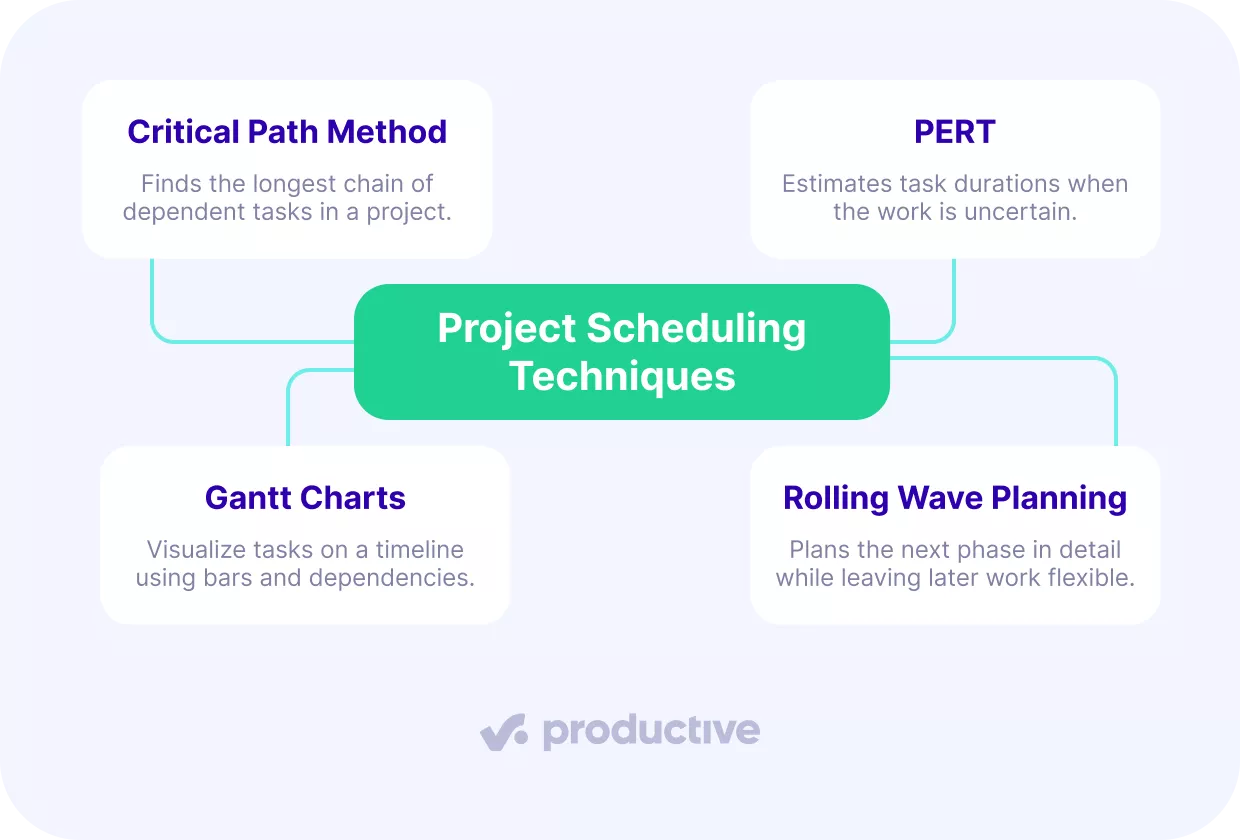
Which Project Scheduling Techniques Should You Know?
The project scheduling techniques you should know are the critical path method, PERT, Gantt charts, and rolling wave planning.
Having introduced the main methods, let’s now look at each one in more detail.
Critical Path Method
The Critical Path Method (CPM) dictates the minimum time to complete the project. The “critical path” is the longest sequence of dependent tasks that can’t be delayed without prolonging the finish date.
CPM helps you focus on what matters most. If someone asks, “Can we move this date up?” you can quickly see whether that task is on the critical path (and must stay on schedule) or has some flexibility. This keeps your plan realistic and helps you avoid surprises.
PERT
PERT (Program Evaluation and Review Technique) is a project management technique you use when activity durations are uncertain. A PERT chart is a network diagram where nodes represent project milestones and arrows represent the tasks that connect them.
If you give every task just one fixed timeframe, you’re much more likely to miss deadlines. PMI, in a different paper, notes that only 29% of projects finish on time, on budget, and within scope. In fact, most projects run 84% longer than planned.
PERT addresses this by using a three-point estimate for uncertain work:
- Optimistic: the duration if things go smoothly
- Most likely: the realistic duration
- Pessimistic: the duration if common delays shows up
PERT weighted estimate = (Optimistic + 4 × Most likely + Pessimistic) ÷ 6
For example, imagine an agency estimating a homepage redesign.
- Optimistic: 24 hours if feedback is fast and revisions are minimal
- Most likely: 40 hours based on past projects
- Pessimistic: 64 hours if approvals drag and revisions stack up
Using the PERT formula:
(24 + 4 × 40 + 64) ÷ 6 = 41,3 hours
That weighted estimate gives the team a more realistic schedule duration to work against, rather than betting everything on a best-case scenario.
PMI states that this approach can raise the probability of on-time, on-budget execution to around 73%.
Gantt Charts
Gantt charts are a project management visualization technique that turns a project schedule into a clear visual timeline. Horizontal bars show when tasks start, how long they last, and how they connect to each other.
These charts are especially helpful when tasks have dependencies. By linking tasks, a Gantt chart makes it easy to see the order of work and what would change if something were to shift. That’s why project managers use them to plan, track progress, and explain timelines to project stakeholders.
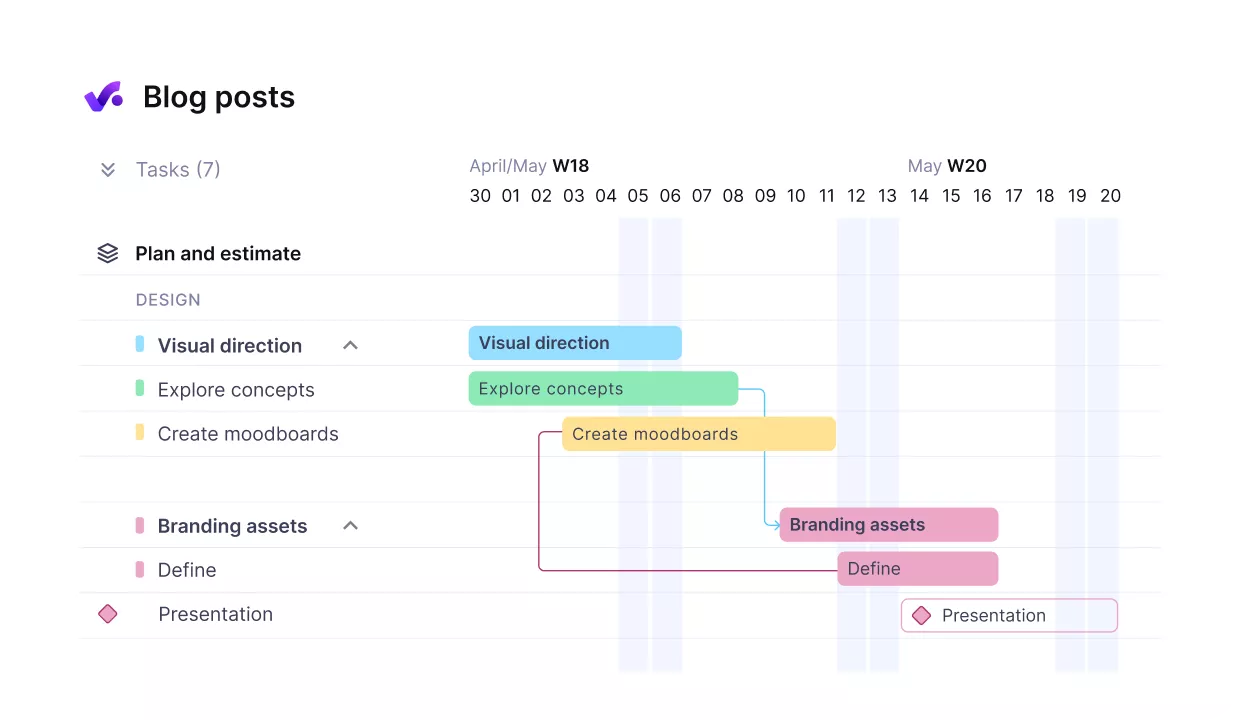
USE PRODUCTIVE’S GANTT CHARTS TO VISUALIZE TIMELINES AND TASK DEPENDENCIES.
In Productive, the Gantt-style timeline brings together scheduling, resourcing, and budgets, so you see the whole project at a glance.
Create smarter Gantt charts in Productive
Rolling Wave Planning
Rolling wave planning is a dynamic project management technique in which teams focus on immediate priorities and work on long-term goals once they have sufficient data.
Instead of locking everything upfront, you plan in waves. Immediate tasks are clearly defined, estimated, and scheduled, while future phases stay flexible. As the project moves forward, those later phases are refined through progressive elaboration as you learn along the way.
This makes rolling wave planning especially useful when goals are still evolving or deadlines are likely to shift.
What Are the Best Practices for Project Schedule Management?
The best practices for scheduling a project are to create multiple project scenarios, to use real-time data, and to keep stakeholders in sync.
We will take a glance at how this can be done.
Best Practice 1: Create Multiple Project Scenarios
Creating multiple project scenarios keeps you flexible, so you don’t get stuck with one schedule too soon. Instead of locking everything in, you try out a few realistic options before making final decisions.
Even small changes in people or timing can make a big difference, especially when your team members are split across several projects.
In Productive, create multiple project scenarios by adjusting who does the work, when they can start, and the cost.
Compare all possible project outcomes side by side, and choose the most logical path forward.
Best Practice 2: Use Real-Time Data
Schedules are only useful if they reflect what’s really happening, not just what you planned. The best way to do this is to keep your task list, time tracking, and resources all in one place. If your team members track time in one tool and plans in another, updates get missed, and your schedule quickly becomes outdated.
Best Practice 3: Keep Stakeholders in Sync
A project schedule only works when everyone sees the same, up-to-date view of progress. When everyone shares the same information, conversations are quicker, and decisions are based on facts.
The right software technology makes this simple. If project stakeholders can view progress and comment directly on deliverables, updates stay clear, and the schedule stays under control.
What Are the Best Project Scheduling Software Options?
The best project scheduling software options are Productive, Smartsheet, and Wrike. We’ll explore each tool in more detail below.
Productive – Best for Resource Scheduling
Productive works well for professional services teams that need their project schedule to stay aligned with real capacity.
You can manage resource utilization in several ways. Resource planning provides a clear view of workloads through capacity indicators, so you can quickly see who is over- or underutilized. For deeper insight, analyze utilization instantly with Productive’s AI reporting.
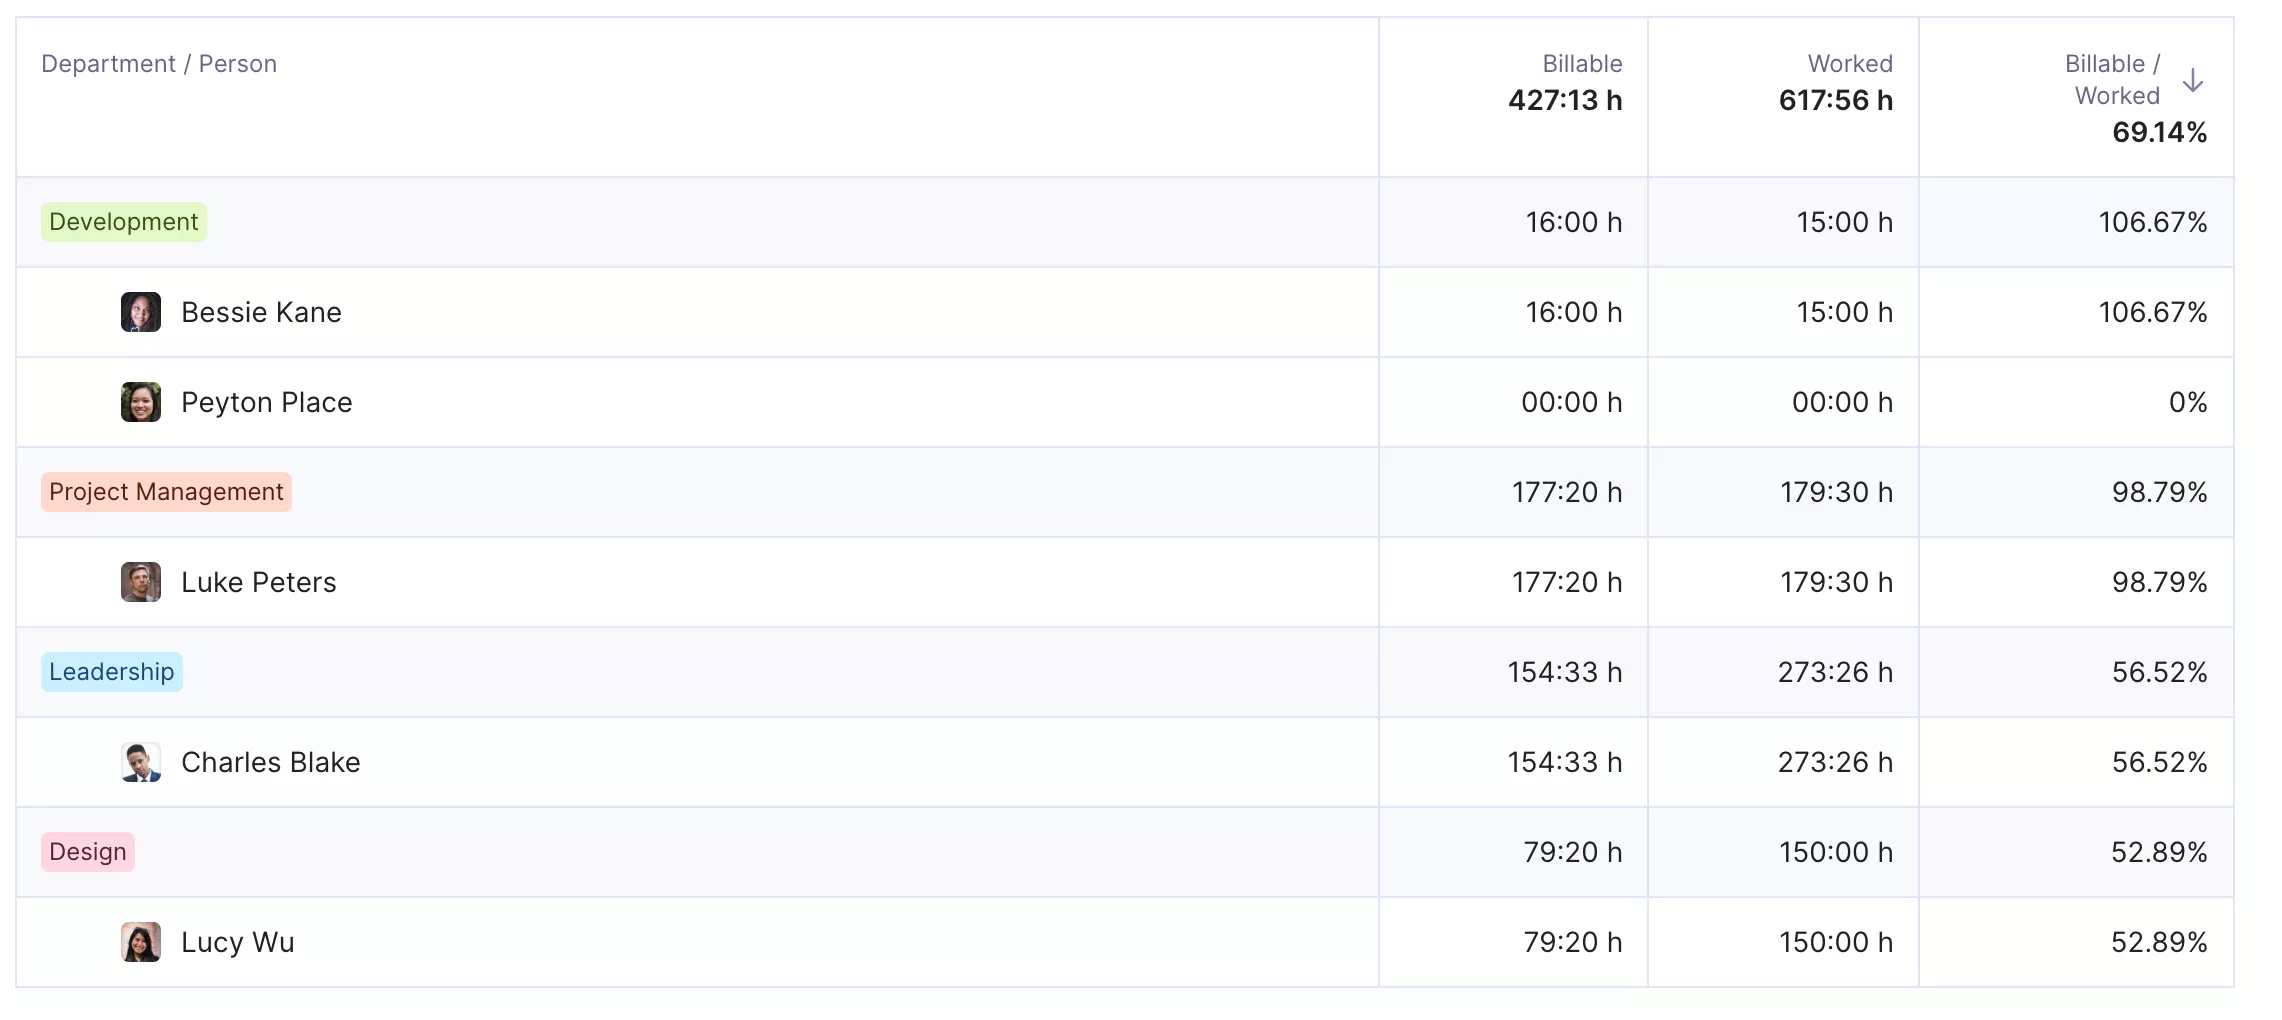
ANALYZE UTILIZATION INSTANTLY BY DEPARTMENT AND SENIORITY WITH PRODUCTIVE.
You can also set utilization targets and monitor them using custom fields, formulas, and color coding.
Beyond scheduling and resourcing, Productive also includes:
- Time tracking
- Automations
- AI-powered docs
- Sales CRM
- Integrations (Slack, Google Calendar, Gmail, Outlook, HubSpot…)
All of this lives in the same system, so your schedule stays connected to how work is actually delivered.
Smartsheet – Best for Scheduling in Spreadsheets
Smartsheet is a resource management software solution that combines spreadsheet-style work with essential resource scheduling tools. If you are comfortable with spreadsheets, it can feel intuitive, especially when you want a familiar grid view but still need structure around deadlines and staffing.
It also supports different sheet types for different teams and industries, and users often highlight its solid automation options for keeping work moving.
Key features:
- Pre-filled timesheets for time tracking
- Resource scheduling to cover staffing needs
- Customizable project planning templates
- Automated alerts and notifications when tasks change
Wrike – Best for Schedule Customization
Wrike is a project management tool for teams that want strong task-level collaboration combined with structured project scheduling.
Wrike offers resource scheduling and financial management features, but keep in mind that budgeting is only available on its highest-tier plan.
Key features:
- Visual timelines for planning work and allocating resources
- Task dependency mapping to support project scheduling
- Real-time insights into billable utilization
- Time management and tracking
- Integrations with popular third-party apps
Wrike stands out for its flexibility. It’s fairly customizable and supports a wide range of integrations, which makes it easier to fit into existing tool stacks. That flexibility works well for teams that need coordination across roles and departments.
If you want to explore more options, you can browse the full list of resource scheduling software.
Final Thoughts
Project scheduling is a living plan that should adapt as your project progresses. When your schedule, resourcing, and time tracking are scattered across different tools, it’s easy to lose track of important details.
Productive solves this by bringing everything together into one place, keeping your project up to date in real time with no worries that anything will be left behind.
If you want this peace of mind, book a demo with Productive to see it in action.
Build schedules you can trust
A project schedule gives clarity when it is updated in real time. Productive links resources, budgets, and time tracking in one place.
