Testing the Test

Code in automated tests should also be tested… right?
A lot of developers avoid writing automated code tests, or at least writing proper ones. Having a basic rendering test for a component or a class, generated by your framework, doesn’t count as testing.
This is completely reasonable. Writing tests screws you up on so many levels:
- it lowers your confidence, showing you how bad your code actually is
- it drags your delivery date, which you so-badly underestimated
- it triggers your OCD because it’s impossible to achieve 100% test coverage
- it generates more work, because you end up with a lot more code to maintain
So it isn’t surprising that only experienced devs do it properly. You need to feel the struggle to actually understand its benefits. And, you need to learn how to test the stuff that will bite your ass in the future.
There are different types of tests: unit, integration, acceptance, e2e, smoke, visual regression tests, etc. Every type of test introduces a new set of problems and requires a different perspective on the code being tested.
The biggest trap when writing tests is that you actually never know if the test is correct. You’re writing code that tests other code, which means you have even more opportunities to make mistakes.
So you need a system to test the test, right? I don’t actually have a solution for this, only a few pieces of advice to give.
Minimize the Logic
The code in the test should be as trivial as possible. No if statements, no for loops, no logic—this is forbidden. Minimize the complexity wherever you can.
The test should also function as documentation, which means it should be readable by a human. Your Product Manager or QA engineer should be able to understand it.
Having a good testing framework is important. At Productive, we’ve developed our own set of abstractions over ember-test-helpers library, which is provided by Ember.
Common Structure
Most of the code in unit/integration tests should look the same.
A typical test consists of:
- setup: the part where you setup data mocks, stubs and the test environment
- construction: render the component or instantiate a unit you’re testing
- assertions: where you make sure that the output of the component/unit is correct
- interactions (+ more assertions): where you interact with the component (clickin’ them buttons) or with the object (callin’ them methods)
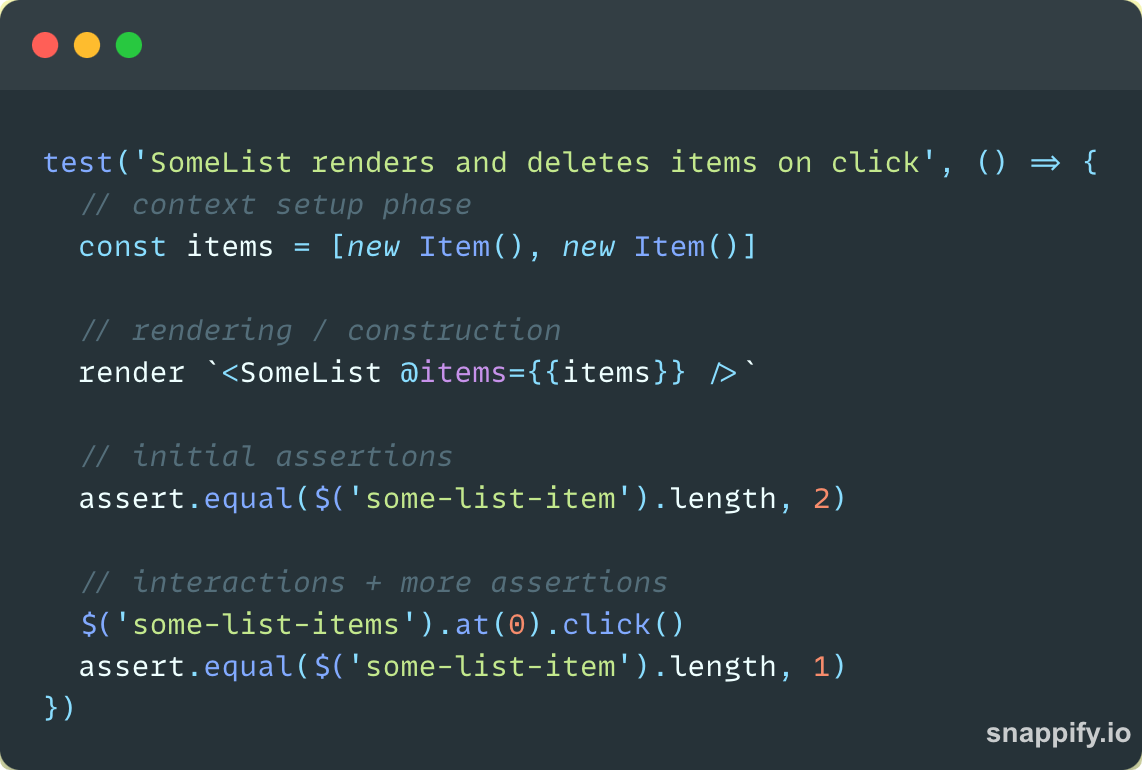
Typical structure of a component rendering test
Being rigid about this structure is crucial. This will help you keep your tests tidy and readable. It will minimise the possibility of making mistakes, but it will not prevent you from falling into “the biggest trap”.
Testing the Test
A great way to test the test is to change the original code the test is testing and then seeing if the tests are failing as they should. It sounds trivial, but I’m pretty sure you’re not doing it that often (at least I’m not 🙂).
As soon as you see the green light in the tests, you feel happy and move on to the next thing— because you’re probably in a rush. And what if you tested the wrong thing?
Let’s take a look at the following example:

Pretty basic. If there are no items, the “items-count” label should not render. We’re testing the {{if}} statement in the template. You’ll see a green light in your CI/CD pipeline and move on happily, right?
Not so fast. Take a closer look at the test: the CSS selector is invalid. We’re missing the the dot in the $(’items-count’) call. So it’s completely wrong, but the test is still passing. 🤯 This is a common pitfall.
Whenever you write an assertion, make sure it’s failing before it passes. You can do that by commenting out (or adjusting) the code responsible for the logic you’re testing.
In this example, you would need to remove the {{#if @items.length}} statement in the template and check out if the test is failing. You would notice that the test isn’t failing, which would indicate that you wrote an invalid test.
This is how you test the test.
Mutation Testing
The idea of changing the codebase to validate how well the tests are written is not new. It’s called Mutation testing and there are testing libraries that do that automatically. A good mutation library should be able to handle the problem from the example above.
If you’re interested, check out this article on Javascript Mutation Testing from Olle Lauri Boström. He’s using Stryker for mutating his Javascript tests. To avoid diving into more detail, I’m just gonna drop a quick quote from the article:
— Simon de Lang
The only way to know that a test actually works is when it fails when you make a code change.
TDD
You can also try the TDD approach. First write a failing test followed by the code that makes the test pass. This would work well in our example because the test would be passing from the start, which isn’t allowed by TDD.
TDD is a somewhat holistic and naive approach. It doesn’t always work out in practice, at least not in the “Frontend land”. But the idea is great, so take all the good parts from it.
How Good Are My Tests?
Our recently joined colleague, Jean Petrić, wrote an excellent academic paper on a similar topic. With a few of his fellow researchers, he tried to answer: “How Good Are My Tests?”
They made a list of 15 testing principles that capture the essence of testing goals and best practices from a quality perspective. Go on and read the article, it’s a gem!
That’s all folks. Happy testin’ 👋

